Netgear RN316 Hardware Manual - Page 26
ReadyNAS 104 rear panel, ReadyNAS OS 6, Software Manual
 |
View all Netgear RN316 manuals
Add to My Manuals
Save this manual to your list of manuals |
Page 26 highlights
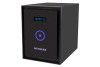
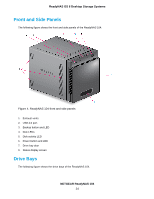
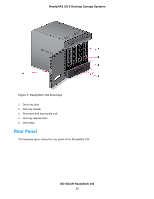
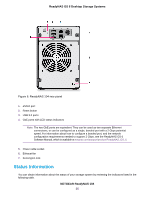
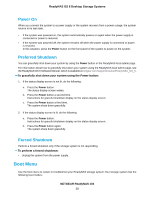
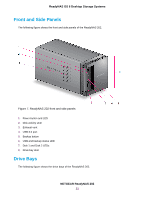
ReadyNAS OS 6 Desktop Storage Systems Figure 6. ReadyNAS 104 rear panel 1. eSATA port 2. Reset button 3. USB 3.0 ports 4. GbE ports with LED status indicators Note The two GbE ports are equivalent. They can be used as two separate Ethernet connections, or can be configured as a single, bonded port with a 2 Gbps potential speed. For information about how to configure a bonded port, and the network configuration requirements needed to support 2 Gbps, see the ReadyNAS OS 6 Software Manual, which is available at netgear.com/support/product/ReadyNAS_OS_6. 5. Power cable socket 6. Exhaust fan 7. Kensington lock Status Information You can obtain information about the status of your storage system by reviewing the indicators listed in the following table. NETGEAR ReadyNAS 104 26
-
 1
1 -
2
-
3
-
4
-
5
-
6
-
7
-
8
-
9
-
10
-
11
-
12
-
13
-
14
-
15
-
16
-
17
-
18
-
19
-
20
-
 21
21 -
 22
22 -
 23
23 -
 24
24 -
 25
25 -
 26
26 -
 27
27 -
 28
28 -
 29
29 -
 30
30 -
 31
31 -
32
-
33
-
34
-
35
-
36
-
37
-
38
-
39
-
40
-
41
-
42
-
43
-
44
-
45
-
46
-
47
-
48
-
49
-
50
-
51
-
52
-
53
-
54
-
55
-
56
-
57
-
58
-
59
-
60
-
61
-
62
-
63
-
64
-
65
-
66
-
67
-
68
-
69
-
70
-
71
-
72
-
73
-
74
-
75
-
76
-
77
-
78
-
79
-
80
-
81
-
82
-
83
-
84
-
85
-
86
-
87
-
88
-
89
-
90
-
91
-
92
-
93
-
94
-
95
-
96
-
97
-
98
-
99
-
100
-
101
-
102
-
103
-
104
-
105
-
106
-
107
-
108
-
109
-
110
-
111
-
112
-
113
-
114
-
115
-
116
-
117
-
118
-
119
-
120
-
121
-
122
-
123
-
124
-
125
-
126
-
127
-
128
-
129
-
130
-
131
-
132
-
133
-
134
-
135
-
136
-
137
-
138
-
139
-
140
-
141
-
142
-
143
-
144
-
145
-
146
-
147
-
148
-
149
-
150
-
151
-
152
-
153
-
154
-
155
-
156
-
157
-
158
-
159
-
160
-
161
-
162
-
163
-
164
-
165
-
166
-
167
-
168
-
169
-
170
-
171
-
172
-
173
-
174
-
175
-
176
-
177
-
178
-
179
-
180
-
181
-
182
-
183
-
184
-
185
-
186
-
187
-
188
-
189
-
190
-
191
-
192
-
193
-
194
-
195
-
196
-
197
-
198
-
199
-
200
-
201
-
202
-
203
-
204
-
205
-
206
-
207
-
208
-
209
-
210
-
211
-
212
-
213
 |
 |
