Netgear RN316 Hardware Manual - Page 37
To access the boot menu, NETGEAR ReadyNAS 202, ReadyNAS OS 6 Desktop Storage Systems, Reset, Power
 |
View all Netgear RN316 manuals
Add to My Manuals
Save this manual to your list of manuals |
Page 37 highlights
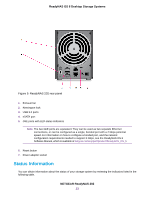
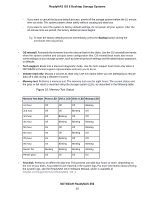
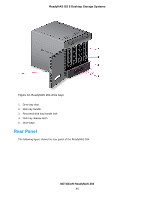
ReadyNAS OS 6 Desktop Storage Systems To access the boot menu: 1. Power off your storage system. 2. Using a straightened paper clip, press and hold the Reset button. 3. Press the Power button. The system powers on. 4. Continue to press the Reset button until the Power LED, USB and backup status LED, disk 1 LED, and disk 2 LED light. 5. Press the Backup button to scroll through boot mode options. The storage system shows the boot mode options using the LEDs, as described in the following table: Boot Mode Status Indicator Description Power LED Disk 1 LED Disk 2 LED USB and Backup LED Boot menu All four LEDs light. Normal Power LED lights. Factory default Disk 1 LED lights. OS reinstall Disk 2 LED lights. Tech support USB and backup status LED lights. Volume read only Power LED and disk 1 LED light. Memory test Power LED and disk 2 LED light. Test disk Power LED and USB and backup status LED light. Legend: • On: • Off: 6. Press and release the Reset button to confirm your boot menu selection. The system boots in the selected boot mode. NETGEAR ReadyNAS 202 37
-
 1
1 -
2
-
3
-
4
-
5
-
6
-
7
-
8
-
9
-
10
-
11
-
12
-
13
-
14
-
15
-
16
-
17
-
18
-
19
-
20
-
21
-
22
-
23
-
24
-
25
-
26
-
27
-
28
-
29
-
30
-
31
-
 32
32 -
 33
33 -
 34
34 -
 35
35 -
 36
36 -
 37
37 -
 38
38 -
 39
39 -
 40
40 -
 41
41 -
 42
42 -
43
-
44
-
45
-
46
-
47
-
48
-
49
-
50
-
51
-
52
-
53
-
54
-
55
-
56
-
57
-
58
-
59
-
60
-
61
-
62
-
63
-
64
-
65
-
66
-
67
-
68
-
69
-
70
-
71
-
72
-
73
-
74
-
75
-
76
-
77
-
78
-
79
-
80
-
81
-
82
-
83
-
84
-
85
-
86
-
87
-
88
-
89
-
90
-
91
-
92
-
93
-
94
-
95
-
96
-
97
-
98
-
99
-
100
-
101
-
102
-
103
-
104
-
105
-
106
-
107
-
108
-
109
-
110
-
111
-
112
-
113
-
114
-
115
-
116
-
117
-
118
-
119
-
120
-
121
-
122
-
123
-
124
-
125
-
126
-
127
-
128
-
129
-
130
-
131
-
132
-
133
-
134
-
135
-
136
-
137
-
138
-
139
-
140
-
141
-
142
-
143
-
144
-
145
-
146
-
147
-
148
-
149
-
150
-
151
-
152
-
153
-
154
-
155
-
156
-
157
-
158
-
159
-
160
-
161
-
162
-
163
-
164
-
165
-
166
-
167
-
168
-
169
-
170
-
171
-
172
-
173
-
174
-
175
-
176
-
177
-
178
-
179
-
180
-
181
-
182
-
183
-
184
-
185
-
186
-
187
-
188
-
189
-
190
-
191
-
192
-
193
-
194
-
195
-
196
-
197
-
198
-
199
-
200
-
201
-
202
-
203
-
204
-
205
-
206
-
207
-
208
-
209
-
210
-
211
-
212
-
213
 |
 |
