Netgear RN51600 Software Manual - Page 79
Use ReadyNAS Remote, Sign
 |
View all Netgear RN51600 manuals
Add to My Manuals
Save this manual to your list of manuals |
Page 79 highlights
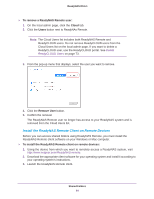
ReadyNAS OS 6.1 3. In the pop-up screen that displays, enter your ReadyCLOUD account credentials and click the Sign In button. You are signed in to ReadyCLOUD. You can now use the ReadyCLOUD web interface to access your data and manage any systems that you added to your ReadyCLOUD account. Use ReadyNAS Remote ReadyNAS Remote is a web-based service that allows you to drag and drop files between your ReadyNAS system and your Windows or Mac computer using the SMB file-sharing protocol. All file permissions and shared folder security settings are retained as if you were on your LAN. All data is encrypted so that it is transmitted securely. Shared Folders 79
-
 1
1 -
2
-
3
-
4
-
5
-
6
-
7
-
8
-
9
-
10
-
11
-
12
-
13
-
14
-
15
-
16
-
17
-
18
-
19
-
20
-
21
-
22
-
23
-
24
-
25
-
26
-
27
-
28
-
29
-
30
-
31
-
32
-
33
-
34
-
35
-
36
-
37
-
38
-
39
-
40
-
41
-
42
-
43
-
44
-
45
-
46
-
47
-
48
-
49
-
50
-
51
-
52
-
53
-
54
-
55
-
56
-
57
-
58
-
59
-
60
-
61
-
62
-
63
-
64
-
65
-
66
-
67
-
68
-
69
-
70
-
71
-
72
-
73
-
 74
74 -
 75
75 -
 76
76 -
 77
77 -
 78
78 -
 79
79 -
 80
80 -
 81
81 -
 82
82 -
 83
83 -
 84
84 -
85
-
86
-
87
-
88
-
89
-
90
-
91
-
92
-
93
-
94
-
95
-
96
-
97
-
98
-
99
-
100
-
101
-
102
-
103
-
104
-
105
-
106
-
107
-
108
-
109
-
110
-
111
-
112
-
113
-
114
-
115
-
116
-
117
-
118
-
119
-
120
-
121
-
122
-
123
-
124
-
125
-
126
-
127
-
128
-
129
-
130
-
131
-
132
-
133
-
134
-
135
-
136
-
137
-
138
-
139
-
140
-
141
-
142
-
143
-
144
-
145
-
146
-
147
-
148
-
149
-
150
-
151
-
152
-
153
-
154
-
155
-
156
-
157
-
158
-
159
-
160
-
161
-
162
-
163
-
164
-
165
-
166
-
167
-
168
-
169
-
170
-
171
-
172
-
173
-
174
-
175
-
176
-
177
-
178
-
179
-
180
-
181
-
182
-
183
-
184
-
185
-
186
-
187
-
188
-
189
-
190
-
191
-
192
-
193
-
194
-
195
-
196
-
197
-
198
-
199
-
200
-
201
-
202
-
203
-
204
-
205
-
206
-
207
-
208
-
209
-
210
-
211
-
212
-
213
-
214
-
215
-
216
-
217
-
218
-
219
-
220
-
221
-
222
-
223
-
224
-
225
-
226
-
227
-
228
-
229
-
230
-
231
-
232
-
233
-
234
-
235
-
236
-
237
-
238
-
239
-
240
-
241
-
242
-
243
-
244
-
245
-
246
-
247
-
248
-
249
-
250
-
251
-
252
-
253
-
254
-
255
-
256
-
257
-
258
-
259
-
260
-
261
-
262
-
263
-
264
-
265
-
266
-
267
-
268
-
269
-
270
-
271
-
272
-
273
-
274
-
275
-
276
 |
 |

Shared Folders
79
ReadyNAS OS 6.1
3.
In the pop-up screen that displays, enter your ReadyCLOUD account credentials and click
the
Sign In
button.
You are signed in to ReadyCLOUD. You can now use the ReadyCLOUD web interface to
access your data and manage any systems that you added to your ReadyCLOUD
account.
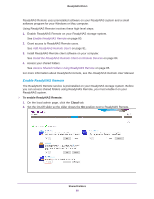
Use ReadyNAS Remote
ReadyNAS Remote is a web-based service that allows you to drag and drop files between
your ReadyNAS system and your Windows or Mac computer using the SMB file-sharing
protocol. All file permissions and shared folder security settings are retained as if you were
on your LAN. All data is encrypted so that it is transmitted securely.