Netgear RN628X00 Hardware Manual - Page 170
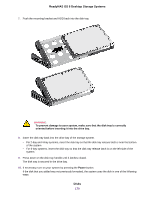
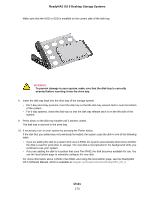
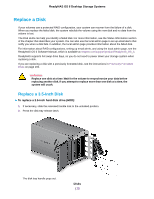
To prevent damage to your system, make sure that the disk tray is correctly
 |
View all Netgear RN628X00 manuals
Add to My Manuals
Save this manual to your list of manuals |
Page 170 highlights
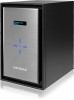
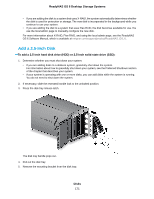
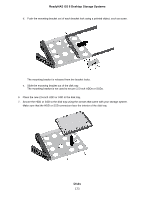
ReadyNAS OS 6 Desktop Storage Systems 7. Push the mounting bracket and HDD back into the disk tray. WARNING: To prevent damage to your system, make sure that the disk tray is correctly oriented before inserting it into the drive bay. 8. Insert the disk tray back into the drive bay of the storage system. • For 2-bay and 4-bay systems, insert the disk tray so that the disk tray release latch is near the bottom of the system. • For 6-bay systems, insert the disk tray so that the disk tray release latch is on the left side of the system. 9. Press down on the disk tray handle until it latches closed. The disk tray is secured in the drive bay. 10. If necessary, turn on your system by pressing the Power button. If the disk that you added was not previously formatted, the system uses the disk in one of the following ways: Disks 170
-
 1
1 -
2
-
3
-
4
-
5
-
6
-
7
-
8
-
9
-
10
-
11
-
12
-
13
-
14
-
15
-
16
-
17
-
18
-
19
-
20
-
21
-
22
-
23
-
24
-
25
-
26
-
27
-
28
-
29
-
30
-
31
-
32
-
33
-
34
-
35
-
36
-
37
-
38
-
39
-
40
-
41
-
42
-
43
-
44
-
45
-
46
-
47
-
48
-
49
-
50
-
51
-
52
-
53
-
54
-
55
-
56
-
57
-
58
-
59
-
60
-
61
-
62
-
63
-
64
-
65
-
66
-
67
-
68
-
69
-
70
-
71
-
72
-
73
-
74
-
75
-
76
-
77
-
78
-
79
-
80
-
81
-
82
-
83
-
84
-
85
-
86
-
87
-
88
-
89
-
90
-
91
-
92
-
93
-
94
-
95
-
96
-
97
-
98
-
99
-
100
-
101
-
102
-
103
-
104
-
105
-
106
-
107
-
108
-
109
-
110
-
111
-
112
-
113
-
114
-
115
-
116
-
117
-
118
-
119
-
120
-
121
-
122
-
123
-
124
-
125
-
126
-
127
-
128
-
129
-
130
-
131
-
132
-
133
-
134
-
135
-
136
-
137
-
138
-
139
-
140
-
141
-
142
-
143
-
144
-
145
-
146
-
147
-
148
-
149
-
150
-
151
-
152
-
153
-
154
-
155
-
156
-
157
-
158
-
159
-
160
-
161
-
162
-
163
-
164
-
 165
165 -
 166
166 -
 167
167 -
 168
168 -
 169
169 -
 170
170 -
 171
171 -
 172
172 -
 173
173 -
 174
174 -
 175
175 -
176
-
177
-
178
-
179
-
180
-
181
-
182
-
183
-
184
-
185
-
186
-
187
-
188
-
189
-
190
-
191
-
192
-
193
-
194
-
195
-
196
-
197
-
198
-
199
-
200
-
201
-
202
-
203
-
204
-
205
-
206
-
207
-
208
-
209
-
210
-
211
-
212
-
213
 |
 |
