Netgear RN628X00 Hardware Manual - Page 173
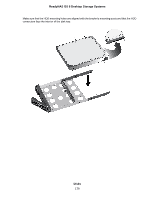
Place the new 2.5-inch HDD or SSD in the disk tray.
 |
View all Netgear RN628X00 manuals
Add to My Manuals
Save this manual to your list of manuals |
Page 173 highlights
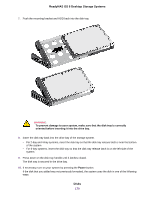
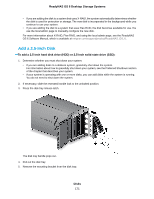
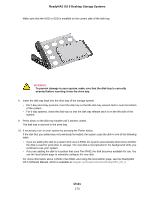
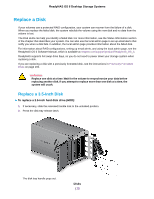
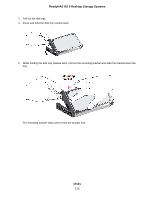
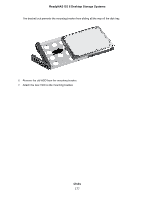
ReadyNAS OS 6 Desktop Storage Systems d. Push the mounting bracket out of each bracket lock using a pointed object, such as a pen. The mounting bracket is released from the bracket locks. e. Slide the mounting bracket out of the disk tray. The mounting bracket is not used to secure 2.5-inch HDDs or SSDs. 6. Place the new 2.5-inch HDD or SSD in the disk tray. 7. Secure the HDD or SSD to the disk tray using the screws that came with your storage system. Make sure that the HDD or SSD connectors face the interior of the disk tray. Disks 173
-
 1
1 -
2
-
3
-
4
-
5
-
6
-
7
-
8
-
9
-
10
-
11
-
12
-
13
-
14
-
15
-
16
-
17
-
18
-
19
-
20
-
21
-
22
-
23
-
24
-
25
-
26
-
27
-
28
-
29
-
30
-
31
-
32
-
33
-
34
-
35
-
36
-
37
-
38
-
39
-
40
-
41
-
42
-
43
-
44
-
45
-
46
-
47
-
48
-
49
-
50
-
51
-
52
-
53
-
54
-
55
-
56
-
57
-
58
-
59
-
60
-
61
-
62
-
63
-
64
-
65
-
66
-
67
-
68
-
69
-
70
-
71
-
72
-
73
-
74
-
75
-
76
-
77
-
78
-
79
-
80
-
81
-
82
-
83
-
84
-
85
-
86
-
87
-
88
-
89
-
90
-
91
-
92
-
93
-
94
-
95
-
96
-
97
-
98
-
99
-
100
-
101
-
102
-
103
-
104
-
105
-
106
-
107
-
108
-
109
-
110
-
111
-
112
-
113
-
114
-
115
-
116
-
117
-
118
-
119
-
120
-
121
-
122
-
123
-
124
-
125
-
126
-
127
-
128
-
129
-
130
-
131
-
132
-
133
-
134
-
135
-
136
-
137
-
138
-
139
-
140
-
141
-
142
-
143
-
144
-
145
-
146
-
147
-
148
-
149
-
150
-
151
-
152
-
153
-
154
-
155
-
156
-
157
-
158
-
159
-
160
-
161
-
162
-
163
-
164
-
165
-
166
-
167
-
 168
168 -
 169
169 -
 170
170 -
 171
171 -
 172
172 -
 173
173 -
 174
174 -
 175
175 -
 176
176 -
 177
177 -
 178
178 -
179
-
180
-
181
-
182
-
183
-
184
-
185
-
186
-
187
-
188
-
189
-
190
-
191
-
192
-
193
-
194
-
195
-
196
-
197
-
198
-
199
-
200
-
201
-
202
-
203
-
204
-
205
-
206
-
207
-
208
-
209
-
210
-
211
-
212
-
213
 |
 |

d.
Push the mounting bracket out of each bracket lock using a pointed object, such as a pen.
The mounting bracket is released from the bracket locks.
e.
Slide the mounting bracket out of the disk tray.
The mounting bracket is not used to secure 2.5-inch HDDs or SSDs.
6.
Place the new 2.5-inch HDD or SSD in the disk tray.
7.
Secure the HDD or SSD to the disk tray using the screws that came with your storage system.
Make sure that the HDD or SSD connectors face the interior of the disk tray.
Disks
173
ReadyNAS OS 6 Desktop Storage Systems