Netgear RND2150 RND2110 User Manual - Page 86
Changing User Passwords, To re-install the ReadyNAS Duo firmware - reset password
 |
UPC - 606449056822
View all Netgear RND2150 manuals
Add to My Manuals
Save this manual to your list of manuals |
Page 86 highlights
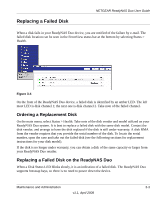
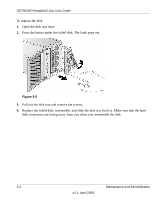
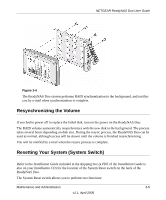
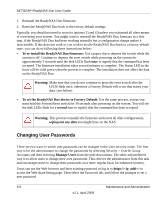
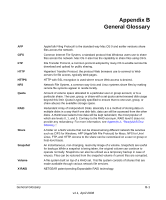
NETGEAR ReadyNAS Duo User Guide 1. Reinstall the ReadyNAS Duo firmware. 2. Reset the ReadyNAS Duo back to the factory default settings. Typically, you should not need to resort to options (1) and (2) unless you exhausted all other means of recovering your system. You might want to reinstall the ReadyNAS Duo firmware as a first step, if the ReadyNAS Duo had been working normally but a configuration change makes it inaccessible. If this does not work or you wish to set the ReadyNAS Duo back to a factory default state, you can do so following these instructions below: • To re-install the ReadyNAS Duo firmware: Use a paper clip to depress the switch while the system is off. Continue to depress the reset switch while powering on the system for approximately 5 seconds until the disk LEDs flash once to signify that the command has been accepted. The firmware installation takes several minutes to complete. The Status LED in the front will be solid green when the process is complete. The installation does not affect the data on the ReadyNAS Duo. Warning: Make sure that you do not continue to press the reset switch after the LEDS flash once, otherwise a Factory Default will occur that erases your data. (see below) • To set the ReadyNAS Duo device to Factory Default: Use the same process, except you must hold the System Reset switch for 30 seconds after powering on the system. You will see the disk LEDs flash for a second time to signify that the command has been accepted. Warning: This process reinstalls the firmware and resets all disk configurations, wiping out any data you might have on the NAS. Changing User Passwords There are two ways in which user passwords can be changed in the User security mode. The first way is for the administrator to change the passwords by selecting Security > User & Group Accounts and then selecting Manage Users from the pull-down menu. The other and preferred way is to allow users to change their own passwords. This relieves the administrator from this task and encourages users to change their passwords on a more regular basis for enhanced security. Users can use the Web browser and their existing password to log in to https:/// to access the Web share listing page. Then select the Password tab, and follow the prompts to set a new password 3-6 Maintenance and Administration v1.1, April 2008
-
 1
1 -
2
-
3
-
4
-
5
-
6
-
7
-
8
-
9
-
10
-
11
-
12
-
13
-
14
-
15
-
16
-
17
-
18
-
19
-
20
-
21
-
22
-
23
-
24
-
25
-
26
-
27
-
28
-
29
-
30
-
31
-
32
-
33
-
34
-
35
-
36
-
37
-
38
-
39
-
40
-
41
-
42
-
43
-
44
-
45
-
46
-
47
-
48
-
49
-
50
-
51
-
52
-
53
-
54
-
55
-
56
-
57
-
58
-
59
-
60
-
61
-
62
-
63
-
64
-
65
-
66
-
67
-
68
-
69
-
70
-
71
-
72
-
73
-
74
-
75
-
76
-
77
-
78
-
79
-
80
-
 81
81 -
 82
82 -
 83
83 -
 84
84 -
 85
85 -
 86
86 -
 87
87 -
 88
88 -
 89
89 -
 90
90 -
 91
91 -
92
-
93
-
94
-
95
-
96
-
97
-
98
-
99
-
100
 |
 |