Netgear RND4475 Software Manual - Page 62
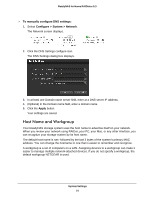
To con Ethernet settings, Con gt; System > Network
 |
UPC - 606449056761
View all Netgear RND4475 manuals
Add to My Manuals
Save this manual to your list of manuals |
Page 62 highlights
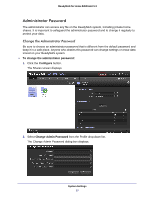
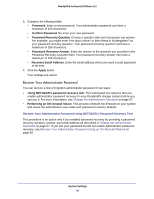
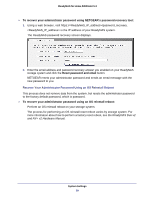
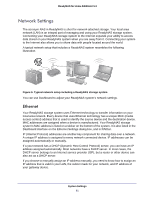
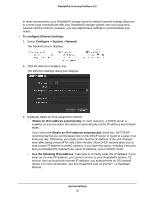
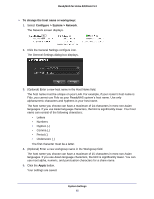
ReadyNAS for Home RAIDiator 5.3 In most environments, your ReadyNAS storage system's default network settings allow you to connect and communicate with your ReadyNAS storage system over your local area network and the Internet. However, you can adjust these settings to accommodate your needs. To configure Ethernet settings: 1. Select Configure > System > Network. The Network screen displays. 2. Click the Ethernet configure icon. The Ethernet Settings dialog box displays. 3. (Optional) Select an iPv4 assignment method: • Obtain an IPv4 address automatically. In most networks, a DHCP server is enabled, so you can select this option to automatically set the IP address and network mask. If you select the Obtain an IPv4 address automatically check box, NETGEAR recommends that you set the lease time on the DHCP server or router to a value of at least one day. Otherwise, you might notice that the IP address of the unit changes even after being turned off for only a few minutes. Most DHCP servers allow you to map a static IP address to a MAC address. If you have this option, enabling it ensures that your ReadyNAS maintains the same IP address, even in DHCP mode. • Use the following IPv4 address. Take care to correctly enter the IP address. If you enter an incorrect IP address, you cannot connect to your ReadyNAS system. To recover from an incorrectly entered IP address, you must perform an OS reinstall reboot. For more information, see the ReadyNAS Duo v2 and NV+ v2 Hardware Manual. System Settings 62
-
 1
1 -
2
-
3
-
4
-
5
-
6
-
7
-
8
-
9
-
10
-
11
-
12
-
13
-
14
-
15
-
16
-
17
-
18
-
19
-
20
-
21
-
22
-
23
-
24
-
25
-
26
-
27
-
28
-
29
-
30
-
31
-
32
-
33
-
34
-
35
-
36
-
37
-
38
-
39
-
40
-
41
-
42
-
43
-
44
-
45
-
46
-
47
-
48
-
49
-
50
-
51
-
52
-
53
-
54
-
55
-
56
-
 57
57 -
 58
58 -
 59
59 -
 60
60 -
 61
61 -
 62
62 -
 63
63 -
 64
64 -
 65
65 -
 66
66 -
 67
67 -
68
-
69
-
70
-
71
-
72
-
73
-
74
-
75
-
76
-
77
-
78
-
79
-
80
-
81
-
82
-
83
-
84
-
85
-
86
-
87
-
88
-
89
-
90
-
91
-
92
-
93
-
94
-
95
-
96
-
97
-
98
-
99
-
100
-
101
-
102
-
103
-
104
-
105
-
106
 |
 |
