Netgear WGX102v2 WGX102v2 Reference Manual - Page 29
Test Your Wireless Connectivity, Basic Installation Troubleshooting Tips, Basic Installation - wireless adapter
 |
View all Netgear WGX102v2 manuals
Add to My Manuals
Save this manual to your list of manuals |
Page 29 highlights
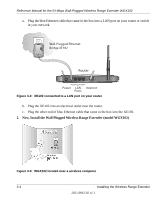
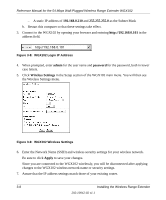
Reference Manual for the 54 Mbps Wall-Plugged Wireless Range Extender WGX102 From the main menu of the browser interface, under Advanced, click LAN IP Setup to view the LAN IP Setup menu, shown below. Figure 3-10: LAN IP Setup menu If necessary, change the first three positions of the IP Address to match the first three positions of the IP address in your router. You can find your router's address by looking in the Network Properties Status page of any Windows computer connected to your router. The "Gateway" address listed on this Status page is the address of your router. Note: If you change the IP Address settings of the WGX102, you will be disconnected when you click Apply. Reconfigure your wireless adapter to match the new settings or access the wireless range extender from a wired computer to make any further changes. 8. Now reconfigure the computer you used in step 1 back to its original TCP/IP settings. Usually, this will mean setting the computer to get its settings automatically via DHCP. Also, make sure the wireless settings of this computer match the wireless settings of your network. Test Your Wireless Connectivity Verify wireless connectivity. Connect to the Internet or log in to the wireless range extender from a computer with a wireless adapter. For wireless connectivity problems, see "Basic Installation Troubleshooting Tips" on page 3-9. You are now wirelessly connected to the Internet! Implement wireless security according to the instructions in "Implementing Appropriate Wireless Security" on page 5-2. Basic Installation Troubleshooting Tips Here are some tips for correcting simple problems you may have. Installing the Wireless Range Extender 3-9 202-10042-02 v1.1
-
 1
1 -
2
-
3
-
4
-
5
-
6
-
7
-
8
-
9
-
10
-
11
-
12
-
13
-
14
-
15
-
16
-
17
-
18
-
19
-
20
-
21
-
22
-
23
-
 24
24 -
 25
25 -
 26
26 -
 27
27 -
 28
28 -
 29
29 -
 30
30 -
 31
31 -
 32
32 -
 33
33 -
 34
34 -
35
-
36
-
37
-
38
-
39
-
40
-
41
-
42
-
43
-
44
-
45
-
46
-
47
-
48
-
49
-
50
-
51
-
52
-
53
-
54
-
55
-
56
-
57
-
58
-
59
-
60
-
61
-
62
-
63
-
64
-
65
-
66
-
67
-
68
-
69
-
70
-
71
-
72
-
73
-
74
-
75
-
76
-
77
-
78
-
79
-
80
-
81
-
82
-
83
-
84
-
85
-
86
-
87
-
88
-
89
-
90
-
91
-
92
-
93
-
94
-
95
-
96
-
97
-
98
-
99
-
100
-
101
-
102
-
103
-
104
-
105
-
106
-
107
-
108
-
109
-
110
-
111
-
112
-
113
-
114
-
115
-
116
-
117
-
118
-
119
-
120
-
121
-
122
-
123
-
124
-
125
-
126
-
127
-
128
-
129
-
130
-
131
-
132
-
133
-
134
-
135
-
136
-
137
-
138
-
139
-
140
-
141
-
142
-
143
-
144
-
145
-
146
-
147
-
148
-
149
-
150
-
151
-
152
-
153
-
154
-
155
-
156
-
157
-
158
-
159
-
160
-
161
-
162
-
163
-
164
-
165
-
166
-
167
-
168
-
169
 |
 |
