Netgear WGX102v2 WGX102v2 Reference Manual - Page 34
admin, password, to restore it to the factory default IP address, and wireless settings.
 |
View all Netgear WGX102v2 manuals
Add to My Manuals
Save this manual to your list of manuals |
Page 34 highlights
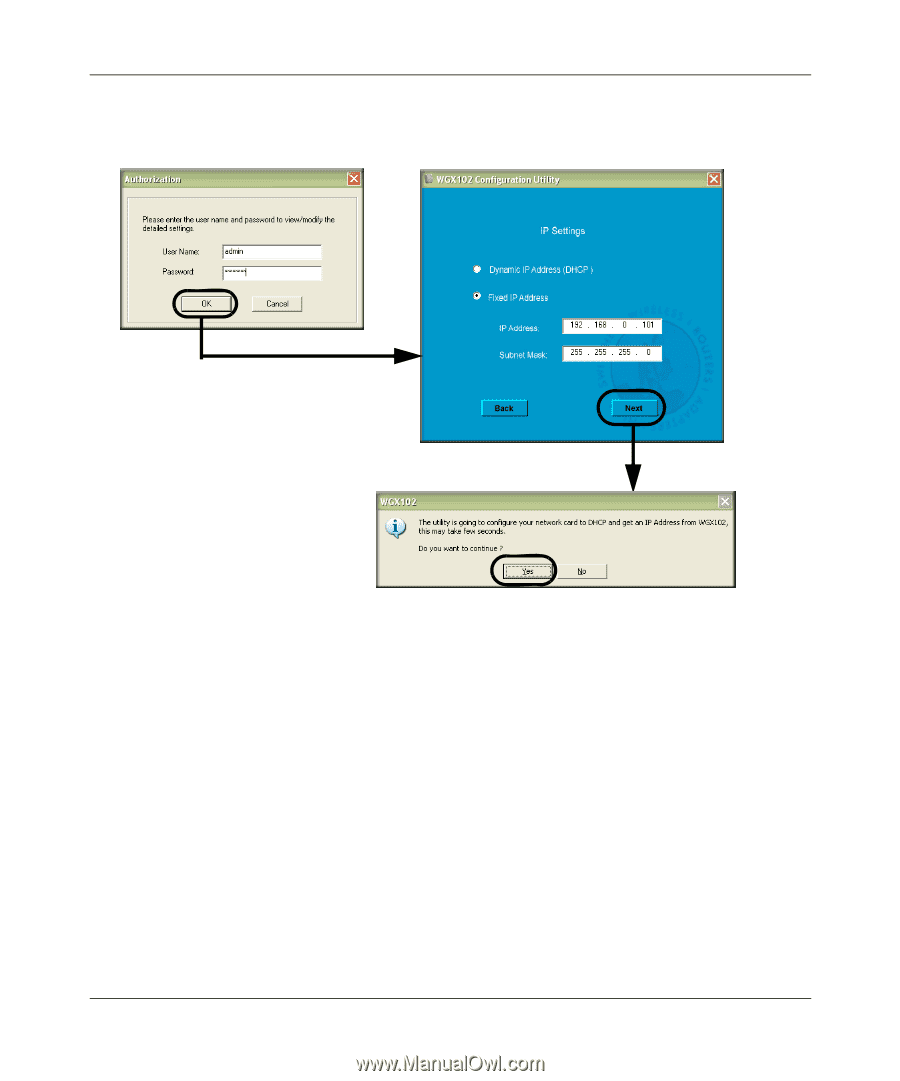
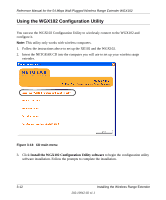
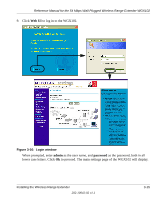
Reference Manual for the 54 Mbps Wall-Plugged Wireless Range Extender WGX102 6. Click Next to proceed. When prompted, enter admin as the user name, and password as the password, both in all lower case letters. Click Ok. Figure 3-15: Login window 7. If needed, update the IP Address so that it is in the same subnet as your existing network. For example, if your existing network uses 192.168.1.1 as the address for your router, your would update the IP Address of the WGX102 to be 192.168.1.101. It is best to continue to use a Fixed IP Address for your WGX102 so that it is easy to log in to make configuration changes. If you ever have a problem, you can always use the reset button on the bottom of the WGX102 to restore it to the factory default IP address, password, and wireless settings. 8. Click Next to proceed. You will be informed that the changes you have requested will be made on the WGX102, and the WGX102 Configuration Utility will automatically reconnect your computer using the new settings. Click Ok to proceed with the update. You will get a confirmation message that the change is complete. 3-14 Installing the Wireless Range Extender 202-10042-02 v1.1
-
 1
1 -
2
-
3
-
4
-
5
-
6
-
7
-
8
-
9
-
10
-
11
-
12
-
13
-
14
-
15
-
16
-
17
-
18
-
19
-
20
-
21
-
22
-
23
-
24
-
25
-
26
-
27
-
28
-
 29
29 -
 30
30 -
 31
31 -
 32
32 -
 33
33 -
 34
34 -
 35
35 -
 36
36 -
 37
37 -
 38
38 -
 39
39 -
40
-
41
-
42
-
43
-
44
-
45
-
46
-
47
-
48
-
49
-
50
-
51
-
52
-
53
-
54
-
55
-
56
-
57
-
58
-
59
-
60
-
61
-
62
-
63
-
64
-
65
-
66
-
67
-
68
-
69
-
70
-
71
-
72
-
73
-
74
-
75
-
76
-
77
-
78
-
79
-
80
-
81
-
82
-
83
-
84
-
85
-
86
-
87
-
88
-
89
-
90
-
91
-
92
-
93
-
94
-
95
-
96
-
97
-
98
-
99
-
100
-
101
-
102
-
103
-
104
-
105
-
106
-
107
-
108
-
109
-
110
-
111
-
112
-
113
-
114
-
115
-
116
-
117
-
118
-
119
-
120
-
121
-
122
-
123
-
124
-
125
-
126
-
127
-
128
-
129
-
130
-
131
-
132
-
133
-
134
-
135
-
136
-
137
-
138
-
139
-
140
-
141
-
142
-
143
-
144
-
145
-
146
-
147
-
148
-
149
-
150
-
151
-
152
-
153
-
154
-
155
-
156
-
157
-
158
-
159
-
160
-
161
-
162
-
163
-
164
-
165
-
166
-
167
-
168
-
169
 |
 |