Netgear WGX102v2 WGX102v2 Reference Manual - Page 41
Assign Password, To assign the Network Password to other HomePlug Stations
 |
View all Netgear WGX102v2 manuals
Add to My Manuals
Save this manual to your list of manuals |
Page 41 highlights
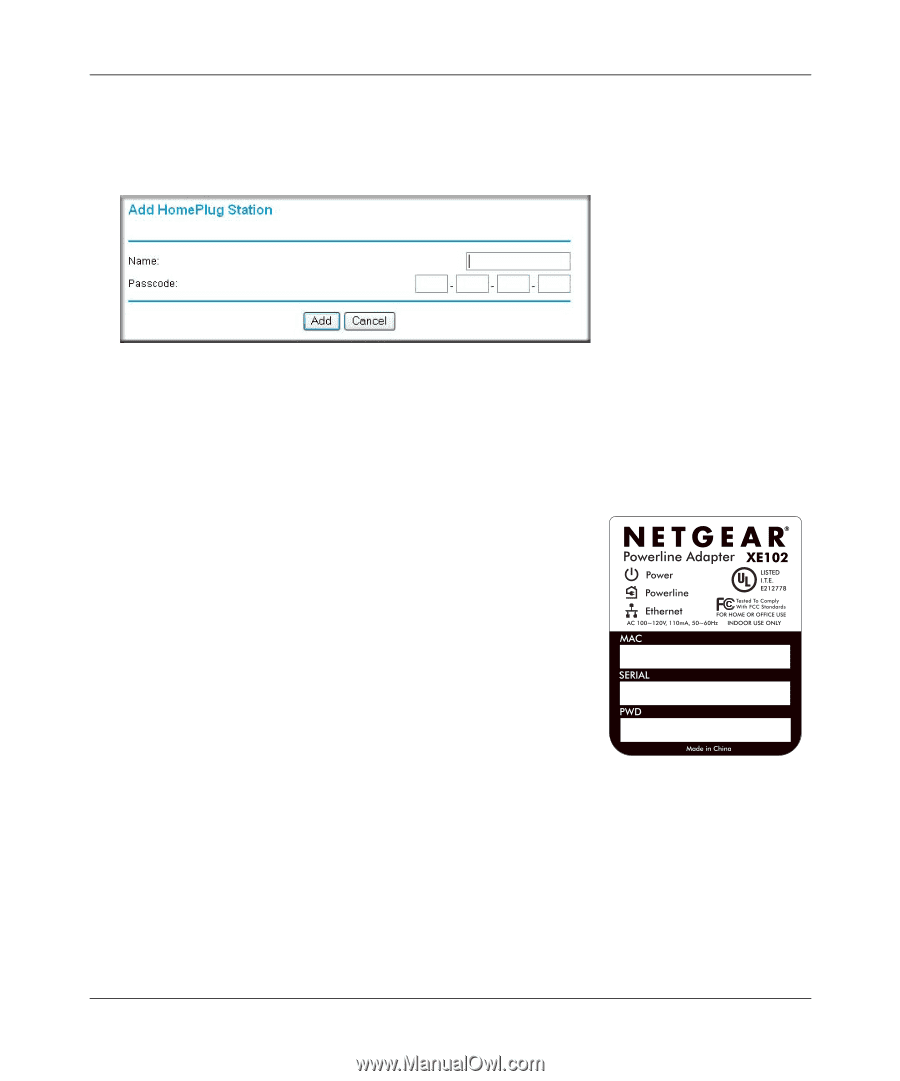
Reference Manual for the 54 Mbps Wall-Plugged Wireless Range Extender WGX102 2. Enter the desired HomePlug Network Password in the field provided. You can also assign this password to other HomePlug stations on your powerline network. Click the Add button to add a HomePlug Station to the list. Figure 4-3: Add HomePlug Station screen To assign the Network Password to other HomePlug Stations: a. Enter a suitable name for the device. For example, a location identifier can be useful such as Downstairs, Upstairs, or Garage. This name is only used for your reference. b. Each HomePlug station has a unique device Passcode (PWD) in the format xxxx-xxxx-xxxx-xxxx, usually shown on a label on the base or rear. Check each HomePlug device to find the Passcode to enter. For each NETGEAR Powerline device that you are installing on your network, write this number down. Example: Device Location: Upstairs Bedroom PWD: MX96-DHEE-U9Y3-BXJB MX96-DHEE-U9Y3-BXJB c. Click Add. 3. On the Wall Plug Settings screen, click Assign Password. The Network Password is then assigned to all the HomePlug stations listed in the table, provided they are currently connected with a powerline connection. Powerline Network Configuration and Security 4-3 202-10042-02 v1.1
-
 1
1 -
2
-
3
-
4
-
5
-
6
-
7
-
8
-
9
-
10
-
11
-
12
-
13
-
14
-
15
-
16
-
17
-
18
-
19
-
20
-
21
-
22
-
23
-
24
-
25
-
26
-
27
-
28
-
29
-
30
-
31
-
32
-
33
-
34
-
35
-
 36
36 -
 37
37 -
 38
38 -
 39
39 -
 40
40 -
 41
41 -
 42
42 -
 43
43 -
 44
44 -
 45
45 -
 46
46 -
47
-
48
-
49
-
50
-
51
-
52
-
53
-
54
-
55
-
56
-
57
-
58
-
59
-
60
-
61
-
62
-
63
-
64
-
65
-
66
-
67
-
68
-
69
-
70
-
71
-
72
-
73
-
74
-
75
-
76
-
77
-
78
-
79
-
80
-
81
-
82
-
83
-
84
-
85
-
86
-
87
-
88
-
89
-
90
-
91
-
92
-
93
-
94
-
95
-
96
-
97
-
98
-
99
-
100
-
101
-
102
-
103
-
104
-
105
-
106
-
107
-
108
-
109
-
110
-
111
-
112
-
113
-
114
-
115
-
116
-
117
-
118
-
119
-
120
-
121
-
122
-
123
-
124
-
125
-
126
-
127
-
128
-
129
-
130
-
131
-
132
-
133
-
134
-
135
-
136
-
137
-
138
-
139
-
140
-
141
-
142
-
143
-
144
-
145
-
146
-
147
-
148
-
149
-
150
-
151
-
152
-
153
-
154
-
155
-
156
-
157
-
158
-
159
-
160
-
161
-
162
-
163
-
164
-
165
-
166
-
167
-
168
-
169
 |
 |