Netgear WGXB102 WGX102v2 Reference Manual - Page 25
Now, Add the WGX102 to Your Wireless Network, Basic Installation, Troubleshooting Tips - ip address
 |
UPC - 606449036572
View all Netgear WGXB102 manuals
Add to My Manuals
Save this manual to your list of manuals |
Page 25 highlights
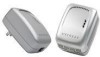
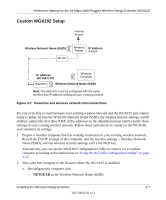
Reference Manual for the 54 Mbps Wall-Plugged Wireless Range Extender WGX102 Plug the WGX102 into an electrical outlet near the wireless computer that you want to connect, and wait one minute. All three LEDs on the WGX102 light up. • Power: The power light should turn solid green. If it does not, see "Basic Installation Troubleshooting Tips" on page 3-9. • HomePlug/Internet: The Internet port light should be lit. If not, make sure the Ethernet cable on the XE102 you connected in the previous step is securely attached to the XE102 and the router, that the router is connected to the modem, and the modem is powered on. • Wireless: The Wireless light should be lit. If the Wireless light is not lit, see "Basic Installation Troubleshooting Tips" on page 3-9. This completes the powerline installation. You may connect additional XE102 bridges to your network. Now, Add the WGX102 to Your Wireless Network Internet Access Wireless Network XE102 Wireless Router Wireless Computer WGX102 Wireless Network Note: The WGX102 must be configured with the same wireless and IP address settings as your existing network. Figure 3-6: Powerline and wireless network interconnections There are two scenarios for adding the WGX102 to your wireless network: Installing the Wireless Range Extender 3-5 202-10042-02 v1.1
-
 1
1 -
2
-
3
-
4
-
5
-
6
-
7
-
8
-
9
-
10
-
11
-
12
-
13
-
14
-
15
-
16
-
17
-
18
-
19
-
 20
20 -
 21
21 -
 22
22 -
 23
23 -
 24
24 -
 25
25 -
 26
26 -
 27
27 -
 28
28 -
 29
29 -
 30
30 -
31
-
32
-
33
-
34
-
35
-
36
-
37
-
38
-
39
-
40
-
41
-
42
-
43
-
44
-
45
-
46
-
47
-
48
-
49
-
50
-
51
-
52
-
53
-
54
-
55
-
56
-
57
-
58
-
59
-
60
-
61
-
62
-
63
-
64
-
65
-
66
-
67
-
68
-
69
-
70
-
71
-
72
-
73
-
74
-
75
-
76
-
77
-
78
-
79
-
80
-
81
-
82
-
83
-
84
-
85
-
86
-
87
-
88
-
89
-
90
-
91
-
92
-
93
-
94
-
95
-
96
-
97
-
98
-
99
-
100
-
101
-
102
-
103
-
104
-
105
-
106
-
107
-
108
-
109
-
110
-
111
-
112
-
113
-
114
-
115
-
116
-
117
-
118
-
119
-
120
-
121
-
122
-
123
-
124
-
125
-
126
-
127
-
128
-
129
-
130
-
131
-
132
-
133
-
134
-
135
-
136
-
137
-
138
-
139
-
140
-
141
-
142
-
143
-
144
-
145
-
146
-
147
-
148
-
149
-
150
-
151
-
152
-
153
-
154
-
155
-
156
-
157
-
158
-
159
-
160
-
161
-
162
-
163
-
164
-
165
-
166
-
167
-
168
-
169
 |
 |