Netgear WNDR3400v2 WNDR3400 User Manual - Page 34
Using a WPS Button to Add a WPS Client, Automatic, Using the Push Button Dome, Entering a PIN - lights
 |
View all Netgear WNDR3400v2 manuals
Add to My Manuals
Save this manual to your list of manuals |
Page 34 highlights
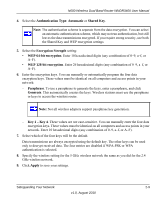
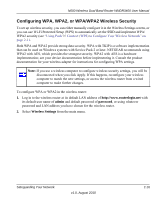
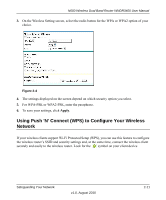
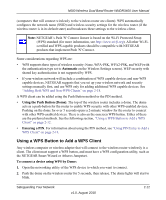
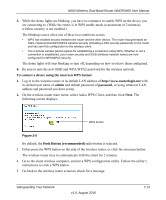
N600 Wireless Dual Band Router WNDR3400 User Manual (computers that will connect wirelessly to the wireless router are clients). WPS automatically configures the network name (SSID) and wireless security settings for the wireless router (if the wireless router is in its default state) and broadcasts these settings to the wireless client. Note: NETGEAR's Push 'N' Connect feature is based on the Wi-Fi Protected Setup (WPS) standard (for more information, see http://www.wi-fi.org). All other Wi-Ficertified and WPS-capable products should be compatible with NETGEAR products that implement Push 'N' Connect. Some considerations regarding WPS are: • WPS supports these types of wireless security: None, WPA-PSK, WPA2-PSK, and WEP (with the authentication type set to Automatic on the Wireless Settings screen). WEP security with shared key authentication is not supported by WPS. • If your wireless network will include a combination of WPS capable devices and non-WPS capable devices, NETGEAR suggests that you set up your wireless network and security settings manually first, and use WPS only for adding additional WPS capable devices. See "Adding Both WPS and Non-WPS Clients" on page 2-18. A WPS client can be added using the Push Button method or the PIN method. • Using the Push Button (Dome). The top of the wireless router includes a dome. The dome acts as a push-button for the router to enable WPS security with other WPS-enabled devices. Pushing on the dome for over 5 seconds opens a 2-minute window for the router to connect with other WPS-enabled devices. There is also an the onscreen WPS button. Either of these are the preferred methods. See the following section, "Using a WPS Button to Add a WPS Client" on page 2-12. • Entering a PIN. For information about using the PIN method, see "Using PIN Entry to Add a WPS Client" on page 2-14. Using a WPS Button to Add a WPS Client Any wireless computer or wireless adapter that will connect to the wireless router wirelessly is a client. The client must support a WPS button, and must have a WPS configuration utility, such as the NETGEAR Smart Wizard or Atheros Jumpstart. To connect a device using WPS by Dome: 1. Open the networking utility of the WPS device to which you want to connect. 2. Push the dome on the wireless router for 5 seconds, then release. The dome lights will start to blink. Safeguarding Your Network v1.0, August 2010 2-12
-
 1
1 -
2
-
3
-
4
-
5
-
6
-
7
-
8
-
9
-
10
-
11
-
12
-
13
-
14
-
15
-
16
-
17
-
18
-
19
-
20
-
21
-
22
-
23
-
24
-
25
-
26
-
27
-
28
-
 29
29 -
 30
30 -
 31
31 -
 32
32 -
 33
33 -
 34
34 -
 35
35 -
 36
36 -
 37
37 -
 38
38 -
 39
39 -
40
-
41
-
42
-
43
-
44
-
45
-
46
-
47
-
48
-
49
-
50
-
51
-
52
-
53
-
54
-
55
-
56
-
57
-
58
-
59
-
60
-
61
-
62
-
63
-
64
-
65
-
66
-
67
-
68
-
69
-
70
-
71
-
72
-
73
-
74
-
75
-
76
-
77
-
78
-
79
-
80
-
81
-
82
-
83
-
84
-
85
-
86
-
87
-
88
-
89
-
90
-
91
-
92
-
93
-
94
-
95
-
96
-
97
-
98
-
99
-
100
-
101
-
102
-
103
-
104
-
105
-
106
-
107
-
108
-
109
-
110
-
111
-
112
-
113
-
114
-
115
-
116
-
117
-
118
-
119
-
120
-
121
-
122
-
123
-
124
-
125
-
126
-
127
-
128
-
129
-
130
-
131
-
132
-
133
-
134
-
135
-
136
-
137
-
138
-
139
-
140
-
141
-
142
-
143
-
144
-
145
-
146
-
147
-
148
-
149
 |
 |