Netgear XE102 XE102 User Manual - Page 12
Connect an XE102 Ethernet Bridge to the Router, Connect Other XE102 Ethernet Bridges - powerline ethernet adapter
 |
UPC - 606449036794
View all Netgear XE102 manuals
Add to My Manuals
Save this manual to your list of manuals |
Page 12 highlights
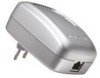
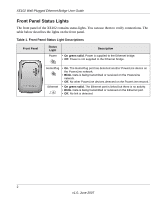
ON OFF XE102 Wall-Plugged Ethernet Bridge User Guide Connect an XE102 Ethernet Bridge to the Router Warning: Do not connect the Ethernet bridges to power strips, extension cords, or surge protectors as this may prevent them from working properly or degrade the network performance. Do not tie or twist the XE102 power cord with the dual output cable, or any other Ethernet cable, as this may degrade the network performance. 1. Disconnect your router from its power adapter. 2. Plug the XE102 Ethernet Bridge into an electrical outlet. Make sure that the electrical outlet is not controlled by a wall switch so as to avoid someone unknowingly turning off power. Check that the XE102 power light comes on. 3. Use the provided Ethernet cable to connect the XE102 Ethernet Bridge to an available Ethernet LAN port on your router. 4. Apply power to your router. Wait for the router to indicate that the LAN port that is connected to the XE102 Ethernet Bridge is linked and active. On the XE102, check that the Ethernet and Powerline status LEDs are on and blinking. Refer to Table 1 for a detailed explanation of the LED behavior. Connect Other XE102 Ethernet Bridges Tip: Before plugging in your other PowerLine devices, write down the device password on the label. You will need it if you want to set up a PowerLine network password. If you are working with several PowerLine devices, write down their MAC addresses. 1. Plug your other PowerLine devices into power outlets in your home near to the other computers and peripherals to be included in your PowerLine local area network. 2. Use an Ethernet cable to connect an Ethernet port on each of the computers and peripherals to the nearest PowerLine device. 3. When you plug in a second Ethernet bridge into a power outlet, check the HomePlug LEDs. They should turn on and then briefly blink at the same time as the Ethernet activity LED. 4 v1.0, June 2007
-
 1
1 -
2
-
3
-
4
-
5
-
6
-
 7
7 -
 8
8 -
 9
9 -
 10
10 -
 11
11 -
 12
12 -
 13
13 -
 14
14 -
 15
15 -
 16
16 -
 17
17 -
18
-
19
-
20
-
21
-
22
 |
 |
