Netgear XE102 XE102 User Manual - Page 19
Troubleshooting, NETGEAR Product Registration, Support, and Documentation, Basic Functioning
 |
UPC - 606449036794
View all Netgear XE102 manuals
Add to My Manuals
Save this manual to your list of manuals |
Page 19 highlights
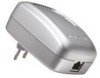
Troubleshooting XE102 Wall-Plugged Ethernet Bridge User Guide This section gives information about troubleshooting your XE102 Wall-Plugged Ethernet Bridge. NETGEAR Product Registration, Support, and Documentation Register your product at http://www.netgear.com/register. Product updates and Web support are available at: http://kbserver.netgear.com/products/XE102.asp. When the Ethernet bridge is connected to the Internet, click the Knowledge Base or the Documentation link under the Web Support menu to view support information or the documentation for the Ethernet bridge. Basic Functioning After you plug in the Ethernet bridge, the following sequence of events should occur: 1. When power is first applied, verify that the Power light is on. 2. After approximately 10 seconds, check the LEDs on the Ethernet bridge. The following should occur: a. The power LED is solid green. b. The blue HomePlug LED is lit. c. The Ethernet LED blinks. If any of these conditions does not occur, refer to the appropriate following section. Power Light Not On • Make sure that, if power to the AC power outlet is controlled by a wall switch, the wall switch is in the on position. • Verify that the wall socket is live. To do this, disconnect the Ethernet bridge and plug in another electrical product, such as a lamp or a hairdryer. • If the Power LED still does not come on, and you have confirmed the power outlet is live, you have a hardware problem and should contact technical support. 11 v1.0, June 2007
-
 1
1 -
2
-
3
-
4
-
5
-
6
-
7
-
8
-
9
-
10
-
11
-
12
-
13
-
 14
14 -
 15
15 -
 16
16 -
 17
17 -
 18
18 -
 19
19 -
 20
20 -
 21
21 -
 22
22
 |
 |
