Nikon 4600 User Manual - Page 97
Using the Set-up Menu
 |
UPC - 018208255245
View all Nikon 4600 manuals
Add to My Manuals
Save this manual to your list of manuals |
Page 97 highlights
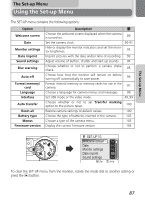
The Set-up Menu The Set-up Menu Using the Set-up Menu The SET-UP menu contains the following options: Option Welcome screen Date Monitor settings Date imprint Sound settings Blur warning Auto off Format memory/ card Language Interface Auto transfer Reset all Battery type Menus Firmware version Description Q Choose the welcome screen displayed when the camera is turned on. 89 Set the camera clock. 90-91 Hide or display the monitor indicators and set the monitor brightness. 92 Imprint pictures with the date and/or time of recording. 93 Adjust volume of button, shutter and start-up sounds. 94 Choose whether or not to perform a camera shake check. 95 Choose how long the monitor will remain on before turning off automatically to save power. 96 Format internal memory or memory cards for use in the camera. 97 Choose a language for camera menus and messages. 99 Set USB mode or the video mode. 49, 99 Choose whether or not to set Transfer marking option to the picture taken. 100 Restore camera settings to default values. 100 Choose the type of batteries inserted in the camera. 102 Choose a type of the camera menu. 103 Display the current firmware version. 104 SET-UP 1/3 Welcome screen Date Monitor settings Date imprint Sound settings :Set :Help To clear the SET-UP menu from the monitor, rotate the mode dial to another setting or press the x button. 87
-
 1
1 -
2
-
3
-
4
-
5
-
6
-
7
-
8
-
9
-
10
-
11
-
12
-
13
-
14
-
15
-
16
-
17
-
18
-
19
-
20
-
21
-
22
-
23
-
24
-
25
-
26
-
27
-
28
-
29
-
30
-
31
-
32
-
33
-
34
-
35
-
36
-
37
-
38
-
39
-
40
-
41
-
42
-
43
-
44
-
45
-
46
-
47
-
48
-
49
-
50
-
51
-
52
-
53
-
54
-
55
-
56
-
57
-
58
-
59
-
60
-
61
-
62
-
63
-
64
-
65
-
66
-
67
-
68
-
69
-
70
-
71
-
72
-
73
-
74
-
75
-
76
-
77
-
78
-
79
-
80
-
81
-
82
-
83
-
84
-
85
-
86
-
87
-
88
-
89
-
90
-
91
-
 92
92 -
 93
93 -
 94
94 -
 95
95 -
 96
96 -
 97
97 -
 98
98 -
 99
99 -
 100
100 -
 101
101 -
 102
102 -
103
-
104
-
105
-
106
-
107
-
108
-
109
-
110
-
111
-
112
-
113
-
114
-
115
-
116
-
117
-
118
-
119
-
120
-
121
-
122
-
123
-
124
-
125
-
126
-
127
-
128
 |
 |
