Nikon COOLPIX S8200 Reference Manual - Page 118
Notes About Panorama Assist, Indicator, Combining Images to Make a Panorama, More Information
 |
View all Nikon COOLPIX S8200 manuals
Add to My Manuals
Save this manual to your list of manuals |
Page 118 highlights
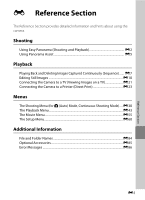
Using Panorama Assist Reference Section 5 Take the next picture. • Frame the next image so that one third of the frame overlaps the first image, and press the shutter-release button. • Repeat this process until the necessary number of images has been taken to complete the scene. 6 Press the k button when shooting is complete. • The camera returns to step 3. 29m 0s End 839 29m 0s End 837 B Notes About Panorama Assist • Set flash mode, self-timer, macro mode and exposure compensation before taking the first picture. They cannot be changed after the first picture is taken. Images cannot be deleted, nor can zoom or Image mode setting (A 71) be adjusted after the first picture is taken. • Shooting ends if the auto off function (E72) is activated. If the camera enters standby mode during shooting, set Auto off to a longer setting. C R Indicator In panorama assist mode, exposure, white balance, and focus for all images in a panorama are fixed at the values for the first image in each series. When the first picture is taken, R is displayed to indicate that exposure, white balance, and focus are locked. 29m 0s C Combining Images to Make a Panorama End 839 Transfer images to a computer (A 84) and use Panorama Maker 5 to join them in a single panorama. Install Panorama Maker 5 from the included ViewNX 2 Installer CD-ROM. • After installing Panorama Maker 5, start the software as explained below. Windows: Select the Start menu > All Programs > ArcSoft Panorama Maker 5 > Panorama Maker 5 Mac OS X: Open the Applications folder > double-click Panorama Maker 5 • For information about using Panorama Maker 5, refer to the on-screen instructions and help information contained in Panorama Maker 5. C More Information See "File and Folder Names" (E84) for more information. E6
-
 1
1 -
2
-
3
-
4
-
5
-
6
-
7
-
8
-
9
-
10
-
11
-
12
-
13
-
14
-
15
-
16
-
17
-
18
-
19
-
20
-
21
-
22
-
23
-
24
-
25
-
26
-
27
-
28
-
29
-
30
-
31
-
32
-
33
-
34
-
35
-
36
-
37
-
38
-
39
-
40
-
41
-
42
-
43
-
44
-
45
-
46
-
47
-
48
-
49
-
50
-
51
-
52
-
53
-
54
-
55
-
56
-
57
-
58
-
59
-
60
-
61
-
62
-
63
-
64
-
65
-
66
-
67
-
68
-
69
-
70
-
71
-
72
-
73
-
74
-
75
-
76
-
77
-
78
-
79
-
80
-
81
-
82
-
83
-
84
-
85
-
86
-
87
-
88
-
89
-
90
-
91
-
92
-
93
-
94
-
95
-
96
-
97
-
98
-
99
-
100
-
101
-
102
-
103
-
104
-
105
-
106
-
107
-
108
-
109
-
110
-
111
-
112
-
 113
113 -
 114
114 -
 115
115 -
 116
116 -
 117
117 -
 118
118 -
 119
119 -
 120
120 -
 121
121 -
 122
122 -
 123
123 -
124
-
125
-
126
-
127
-
128
-
129
-
130
-
131
-
132
-
133
-
134
-
135
-
136
-
137
-
138
-
139
-
140
-
141
-
142
-
143
-
144
-
145
-
146
-
147
-
148
-
149
-
150
-
151
-
152
-
153
-
154
-
155
-
156
-
157
-
158
-
159
-
160
-
161
-
162
-
163
-
164
-
165
-
166
-
167
-
168
-
169
-
170
-
171
-
172
-
173
-
174
-
175
-
176
-
177
-
178
-
179
-
180
-
181
-
182
-
183
-
184
-
185
-
186
-
187
-
188
-
189
-
190
-
191
-
192
-
193
-
194
-
195
-
196
-
197
-
198
-
199
-
200
-
201
-
202
-
203
-
204
-
205
-
206
-
207
-
208
-
209
-
210
-
211
-
212
-
213
-
214
-
215
-
216
-
217
-
218
-
219
-
220
-
221
-
222
-
223
-
224
-
225
-
226
-
227
-
228
 |
 |
