Nikon Coolpix  L12 User's Manual - Page 75
Connecting to a Computer, Before Connecting the Camera
 |
UPC - 018208255344
View all Nikon Coolpix manuals
Add to My Manuals
Save this manual to your list of manuals |
Page 75 highlights
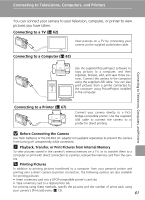
Connecting to a Computer Connecting to Televisions, Computers, and Printers Use the supplied USB cable to connect the camera to a computer, and copy (transfer) pictures to a computer with the supplied PictureProject software. Before Connecting the Camera Installing PictureProject Before transferring pictures or movies to a computer, PictureProject must be installed. For more information on installing and using PictureProject, see the Quick Start Guide. Confirming USB Option The following two methods can be used to transfer pictures from the camera to a computer: • Press E (d) on the camera. • Click [Transfer] in PictureProject. The method used will depend on your computer's operating system and the USB option selected in the camera's setup menu. Operating system1 USB mode2 E (d) on the camera3 [Transfer] in PictureProject Windows Vista (32-bit HomeBasic/ HomePremium/Business/Enterprise/Ultimate editions) Choose [Mass storage]. Choose [PTP] or [Mass storage]. Windows XP Home Edition Windows XP Professional Windows 2000 Professional4 Choose [PTP] or [Mass storage]. Choose [Mass storage]. Mac OS X (10.3.9, 10.4.x) Choose [PTP]. Choose [PTP] or [Mass storage]. 1 This camera supports the USB options, [PTP] (default setting) and [Mass storage]. 2 The camera's E (d) button cannot be used to transfer pictures in the following cases. Use [Transfer] in PictureProject. • When transferring pictures from the camera's internal memory and [Mass storage] is selected in the [USB] menu. • When the memory card write-protect switch is in the "lock" position. Unlock by sliding the switch to the "write" position before transferring pictures. 3 If your computer is running Windows 2000 Professional, be sure to set the USB option to [Mass storage]. If [PTP] is selected, the Found New Hardware Wizard will be displayed when the camera is connected to the computer. Select [Cancel], close the window, and disconnect the camera from the computer. 4 Refer to the Nikon website for the latest information on operating system compatibility. 63
-
 1
1 -
2
-
3
-
4
-
5
-
6
-
7
-
8
-
9
-
10
-
11
-
12
-
13
-
14
-
15
-
16
-
17
-
18
-
19
-
20
-
21
-
22
-
23
-
24
-
25
-
26
-
27
-
28
-
29
-
30
-
31
-
32
-
33
-
34
-
35
-
36
-
37
-
38
-
39
-
40
-
41
-
42
-
43
-
44
-
45
-
46
-
47
-
48
-
49
-
50
-
51
-
52
-
53
-
54
-
55
-
56
-
57
-
58
-
59
-
60
-
61
-
62
-
63
-
64
-
65
-
66
-
67
-
68
-
69
-
 70
70 -
 71
71 -
 72
72 -
 73
73 -
 74
74 -
 75
75 -
 76
76 -
 77
77 -
 78
78 -
 79
79 -
 80
80 -
81
-
82
-
83
-
84
-
85
-
86
-
87
-
88
-
89
-
90
-
91
-
92
-
93
-
94
-
95
-
96
-
97
-
98
-
99
-
100
-
101
-
102
-
103
-
104
-
105
-
106
-
107
-
108
-
109
-
110
-
111
-
112
-
113
-
114
-
115
-
116
-
117
-
118
-
119
-
120
-
121
-
122
-
123
-
124
-
125
-
126
-
127
-
128
-
129
-
130
-
131
-
132
-
133
-
134
-
135
-
136
-
137
-
138
-
139
-
140
-
141
-
142
-
143
-
144
 |
 |