Nikon Coolpix  L12 User's Manual - Page 78
Marking Pictures for Transfer, Windows Vista/XP Home Edition/Windows XP Professional
 |
UPC - 018208255344
View all Nikon Coolpix manuals
Add to My Manuals
Save this manual to your list of manuals |
Page 78 highlights
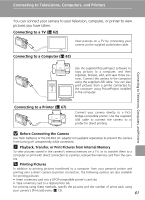
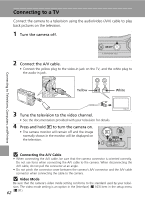
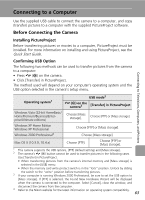
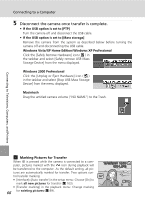
Connecting to a Computer 5 Disconnect the camera once transfer is complete. • If the USB option is set to [PTP] Turn the camera off and disconnect the USB cable. • If the USB option is set to [Mass storage] Remove the camera from the system as described below before turning the camera off and disconnecting the USB cable. Windows Vista/XP Home Edition/Windows XP Professional Click the [Safely Remove Hardware] icon ( ) in the taskbar and select [Safely remove USB Mass Storage Device] from the menu displayed. Windows 2000 Professional Click the [Unplug or Eject Hardware] icon ( ) in the taskbar and select [Stop USB Mass Storage Device] from the menu displayed. Macintosh Drag the untitled camera volume ("NO NAME") to the Trash. Connecting to Televisions, Computers, and Printers k Marking Pictures for Transfer When d is pressed while the camera is connected to a computer, pictures marked with the E icon during playback will be transferred to the computer. As the default setting, all pictures are automatically marked for transfer. Two options control transfer marking: • [Interface]>[Auto transfer] in the setup menu: Choose [On] to mark all new pictures for transfer (c 103). • [Transfer marking] in the playback menu: Change marking 66 for existing pictures (c 89). 15/05/2007 15:30 0004.JPG 4/ 4
-
 1
1 -
2
-
3
-
4
-
5
-
6
-
7
-
8
-
9
-
10
-
11
-
12
-
13
-
14
-
15
-
16
-
17
-
18
-
19
-
20
-
21
-
22
-
23
-
24
-
25
-
26
-
27
-
28
-
29
-
30
-
31
-
32
-
33
-
34
-
35
-
36
-
37
-
38
-
39
-
40
-
41
-
42
-
43
-
44
-
45
-
46
-
47
-
48
-
49
-
50
-
51
-
52
-
53
-
54
-
55
-
56
-
57
-
58
-
59
-
60
-
61
-
62
-
63
-
64
-
65
-
66
-
67
-
68
-
69
-
70
-
71
-
72
-
 73
73 -
 74
74 -
 75
75 -
 76
76 -
 77
77 -
 78
78 -
 79
79 -
 80
80 -
 81
81 -
 82
82 -
 83
83 -
84
-
85
-
86
-
87
-
88
-
89
-
90
-
91
-
92
-
93
-
94
-
95
-
96
-
97
-
98
-
99
-
100
-
101
-
102
-
103
-
104
-
105
-
106
-
107
-
108
-
109
-
110
-
111
-
112
-
113
-
114
-
115
-
116
-
117
-
118
-
119
-
120
-
121
-
122
-
123
-
124
-
125
-
126
-
127
-
128
-
129
-
130
-
131
-
132
-
133
-
134
-
135
-
136
-
137
-
138
-
139
-
140
-
141
-
142
-
143
-
144
 |
 |
