Nikon SB-R200 Wireless Speedlight Users Manual - English - Page 23
Wireless Remote Speedlight SB-R200 - sb i ttl wireless remote speedlight flash head
 |
View all Nikon SB-R200 Wireless Speedlight manuals
Add to My Manuals
Save this manual to your list of manuals |
Page 23 highlights
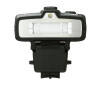
„ Wireless Remote Speedlight SB-R200 z Preparation 9 10 11 1 4 3 2 1 C B A 2 12 8 ON/OFF 7 WISRPEELEEDSLISGRHETMSOBT-ER200 3 13 4 14 5 LOCK 5 6 1 [CHANNEL] select dial Sets the communication channel through which the Commander and SB-R200 units exchange data (p. 35). 2 [GROUP] select dial Sets the group of the SB-R200 (p. 36). 3 Target Light (Focus-Assist Illuminator) 4 Flash head 5 Release button Hold down and slowly move the SB-R200 until it comes to the desired position, then release the button to secure (p. 31). 6 Mounting Foot (p. 31) 7 Target Light Button Sets the target light to turn on or off (p. 90). 8 [ON/OFF] button Press to turn the power on or off. To avoid accidental firing or a malfunction when carrying the SB-R200 in your camera bag, turn off the flash unit. 9 TTL cord terminal Connects the SU-800 to the SB-R200 via a cord when used with cameras that are not compatible with CLS (p. 110). 10 Terminal cover Close the cover when not using the TTL cord. 11 Ready-light The lamp lights up in green when the power is on. It turns red when the SB-R200 is fully recycled and ready to fire. The green lamp blinks when battery power is weak. 12 Battery chamber lid (p. 30) 13 Light sensor window for wireless remote flash 14 Lock switch Secures the SB-R200 to the Attachment Ring (p. 31). 23
-
 1
1 -
2
-
3
-
4
-
5
-
6
-
7
-
8
-
9
-
10
-
11
-
12
-
13
-
14
-
15
-
16
-
17
-
 18
18 -
 19
19 -
 20
20 -
 21
21 -
 22
22 -
 23
23 -
 24
24 -
 25
25 -
 26
26 -
 27
27 -
 28
28 -
29
-
30
-
31
-
32
-
33
-
34
-
35
-
36
-
37
-
38
-
39
-
40
-
41
-
42
-
43
-
44
-
45
-
46
-
47
-
48
-
49
-
50
-
51
-
52
-
53
-
54
-
55
-
56
-
57
-
58
-
59
-
60
-
61
-
62
-
63
-
64
-
65
-
66
-
67
-
68
-
69
-
70
-
71
-
72
-
73
-
74
-
75
-
76
-
77
-
78
-
79
-
80
-
81
-
82
-
83
-
84
-
85
-
86
-
87
-
88
-
89
-
90
-
91
-
92
-
93
-
94
-
95
-
96
-
97
-
98
-
99
-
100
-
101
-
102
-
103
-
104
-
105
-
106
-
107
-
108
-
109
-
110
-
111
-
112
-
113
-
114
-
115
-
116
-
117
-
118
-
119
-
120
-
121
-
122
-
123
-
124
-
125
-
126
-
127
-
128
-
129
-
130
-
131
-
132
-
133
-
134
 |
 |
