Nintendo GAMECUBE Instruction Booklet - Page 9
Caution
 |
UPC - 045496940027
View all Nintendo GAMECUBE manuals
Add to My Manuals
Save this manual to your list of manuals |
Page 9 highlights
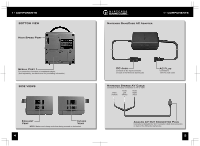
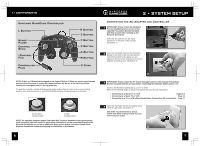
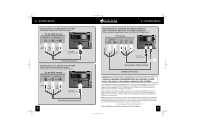
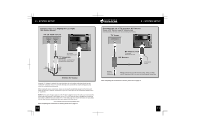
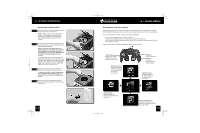
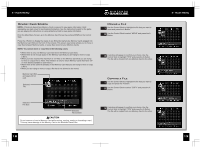
3 • SYSTEM OPERATION After making the necessary connections described in Section 2, System Setup, make sure that there is unrestricted air flow to the Nintendo GameCube. Once the system is properly located, continue with the instructions below. CAUTION The Nintendo GameCube has intake/exhaust vents on the right and left sides designed to maintain adequate ventilation. Do not operate the console in any location where these vents may become covered or obstructed. 1 Turn your TV on. If the console is connected to your VCR, turn it on also and set it to "VCR" mode. 2 For all of the connection methods except the RF switch method, you will need to set the appropriate "Input Select" setting for your TV or VCR. (Illustration 1) INPUT SELECT INFORMATION The input select allows you to switch between the different inputs on your TV or VCR. 1 Usually this would be between the Antenna input and the Audio/Video input(s). Locate the input select for the component that the Stereo AV Cable is connected to (either the TV or VCR). The most common locations for input select are: • A button on the front of the TV or VCR. • A button on the remote control. • A high-numbered or low numbered channel (92, 99, 00, or 02) on the TV or VCR. • An on-screen menu selection. Manufacturers of TVs and VCRs use different names and locations for "Input Select". The 2 common names for the input select are: input, select, input select, line, line in, source, in, EXT, and AUX. Consult your TV or VCR instruction manual for details. NOTE: More information on "Input Select" is available on our web site at www.nintendo.com/consumer/inputselects.html For the RF switch connection, set your TV channel to 3 and the switch on the RF Modulator to 3. If channel 3 has an active television station, change both switches to channel 4. 3 Make sure that both the controller and AC Adapter are properly plugged into the console and the wall outlet. (Illustration 2) 3 4 Press the Open Button to open the Disc Cover. (Illustration 3) VIDEO 12 3 • SYSTEM OPERATION IMPORTANT: Please review the Game Disc Precautions/Maintenance sections of the separate Health and Safety Precautions Booklet included with this product before using Nintendo GameCube Discs. 5 Place the Game Disc, printed side up, into the disc compartment and onto the center hub (Illustration 4). Do not touch the laser lens. 6 Close the Disc Cover. (Illustration 5) 7 Press the Power Button to turn the power on. (Illustration 6) 4 When the power is turned on for the first time, the Nintendo GameCube logo screen, shown below, will appear followed by the Main Menu screen. NOTE: If you don't see the logo screen on your TV, review Step 2 or go to the Troubleshooting section on page 21. The Main Menu allows you to set the date and time, see information about the game loaded into the console, set various options, and access Memory Card information. See pages 15-20 for instructions on the Main Menu screens. 5 Nintendo GameCube logo screen Main Menu Screen 6 13
-
 1
1 -
2
-
3
-
 4
4 -
 5
5 -
 6
6 -
 7
7 -
 8
8 -
 9
9 -
 10
10 -
 11
11 -
 12
12 -
 13
13 -
 14
14 -
15
-
16
 |
 |