Nokia 5190 User Guide - Page 28
Copy and move contacts, Add a contact to a caller group, Create a contact group
 |
View all Nokia 5190 manuals
Add to My Manuals
Save this manual to your list of manuals |
Page 28 highlights
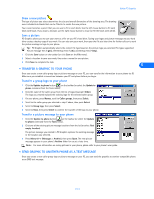
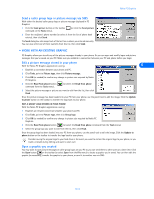
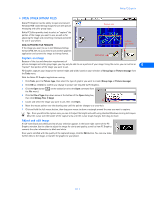
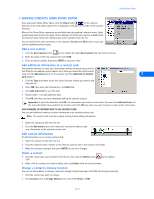
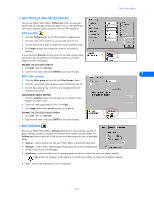
Nokia Phone Editor Note: Your SIM card does not support multiple numbers per name (or other information such as e-mail addresses). For more information on how your phone processes the copying of phone book entries with multiple numbers per name to your SIM card, please see your phone's user guide. Copy and move contacts Your PC's hard drive offers you virtually unlimited storage space for names and numbers. You can copy phone book entries to the Phone Editor's PC folder to back up your data, or move entries to the PC folder, (freeing memory for other entries). 1 Click the folder containing the contacts you want to copy or move (example: Phone ). 2 Click the contact you wish to copy or move (or hold CTRL, then click to select multiple contacts). 3 Click the Copy button to copy (or click the Cut button to move). 4 Click the folder where you want the contacts stored (example: PC folder ). 5 Click the Paste button to place the selected contacts in the folder. Add a contact to a caller group You can use Phone Editor to assign phone book entries to one of the available caller groups. If you are unfamiliar with the caller group feature, please see your phone's user guide. 1 Right-click the contact you wish to assign to a caller group, then click Caller Group. 2 Click the drop-down arrow, then click the desired caller group. 3 Click OK to change the caller group assignment. 7 Create a contact group You can create a contact group that functions as a distribution list when you use Phone Editor to send SMS messages. Contact groups are stored in the Contact Groups folder. 1 Click the + next to the PC folder, then click the Contact Groups folder. 2 Click Contact, point to New, then click Contact Group (or right-click the Contact Groups folder, then select Create Contact Group). 3 Type the name of the new contact group folder, then press ENTER. 4 Add members to the contact group by copying or moving contacts into this folder (see "Copy and move contacts" above). [ 24 ]
-
 1
1 -
2
-
3
-
4
-
5
-
6
-
7
-
8
-
9
-
10
-
11
-
12
-
13
-
14
-
15
-
16
-
17
-
18
-
19
-
20
-
21
-
22
-
 23
23 -
 24
24 -
 25
25 -
 26
26 -
 27
27 -
 28
28 -
 29
29 -
 30
30 -
 31
31 -
 32
32 -
 33
33 -
34
-
35
-
36
-
37
-
38
-
39
-
40
-
41
-
42
-
43
-
44
-
45
-
46
-
47
-
48
-
49
-
50
-
51
-
52
 |
 |
