Nokia IP390 Installation Guide - Page 60
Installing a Flash-Memory PC Card, Before You Begin - cli commands
 |
View all Nokia IP390 manuals
Add to My Manuals
Save this manual to your list of manuals |
Page 60 highlights
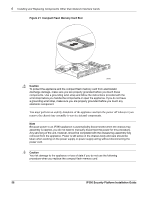
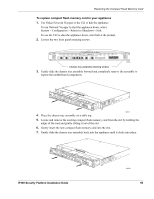
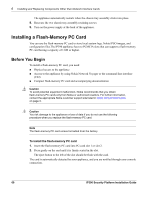
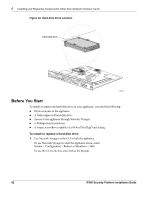
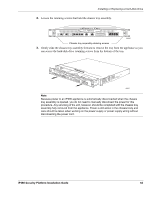
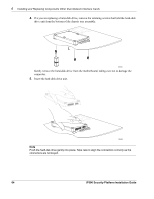
6 Installing and Replacing Components Other than Network Interface Cards The appliance automatically restarts when the chassis tray assembly clicks into place. 8. Resecure the two chassis tray assembly retaining screws. 9. Turn on the power supply at the back of the appliance. Installing a Flash-Memory PC Card You can use the flash-memory PC card to store local system logs, Nokia IPSO images, and configuration files.The IP390 appliance has two PCMCIA slots that can support a flash-memory PC card having a capacity of 1 GB or higher. Before You Begin To install a flash-memory PC card, you need: „ Physical access to the appliance „ Access to the appliance by using Nokia Network Voyager or the command-line interface (CLI) „ Compact flash-memory PC card and accompanying documentation Caution To avoid potential equipment malfunction, Nokia recommends that you obtain flash-memory PC cards only from Nokia or authorized resellers. For further information, contact the appropriate Nokia customer support site listed in Nokia Contact Information on page 3. Caution You risk damage to the appliance or loss of data if you do not use the following procedure when you replace the flash-memory PC card. Note The flash-memory PC card comes formatted from the factory. To install the flash-memory PC card 1. Insert the flash-memory PC card into PC-card slot 1 or slot 2. 2. Press gently on the card until it is firmly seated in the slot. The eject button to the left of the slot should be flush with the card. The card is automatically detected by your appliance, and you are notified through your console connection. 60 IP390 Security Platform Installation Guide
-
 1
1 -
2
-
3
-
4
-
5
-
6
-
7
-
8
-
9
-
10
-
11
-
12
-
13
-
14
-
15
-
16
-
17
-
18
-
19
-
20
-
21
-
22
-
23
-
24
-
25
-
26
-
27
-
28
-
29
-
30
-
31
-
32
-
33
-
34
-
35
-
36
-
37
-
38
-
39
-
40
-
41
-
42
-
43
-
44
-
45
-
46
-
47
-
48
-
49
-
50
-
51
-
52
-
53
-
54
-
 55
55 -
 56
56 -
 57
57 -
 58
58 -
 59
59 -
 60
60 -
 61
61 -
 62
62 -
 63
63 -
 64
64 -
 65
65 -
66
-
67
-
68
-
69
-
70
-
71
-
72
-
73
-
74
-
75
-
76
-
77
-
78
-
79
-
80
-
81
-
82
-
83
-
84
-
85
-
86
-
87
-
88
-
89
-
90
-
91
-
92
-
93
-
94
-
95
-
96
-
97
 |
 |