NordicTrack Ellipse E7 English Manual - Page 11
Iii+94444, 57tei
 |
View all NordicTrack Ellipse E7 manuals
Add to My Manuals
Save this manual to your list of manuals |
Page 11 highlights
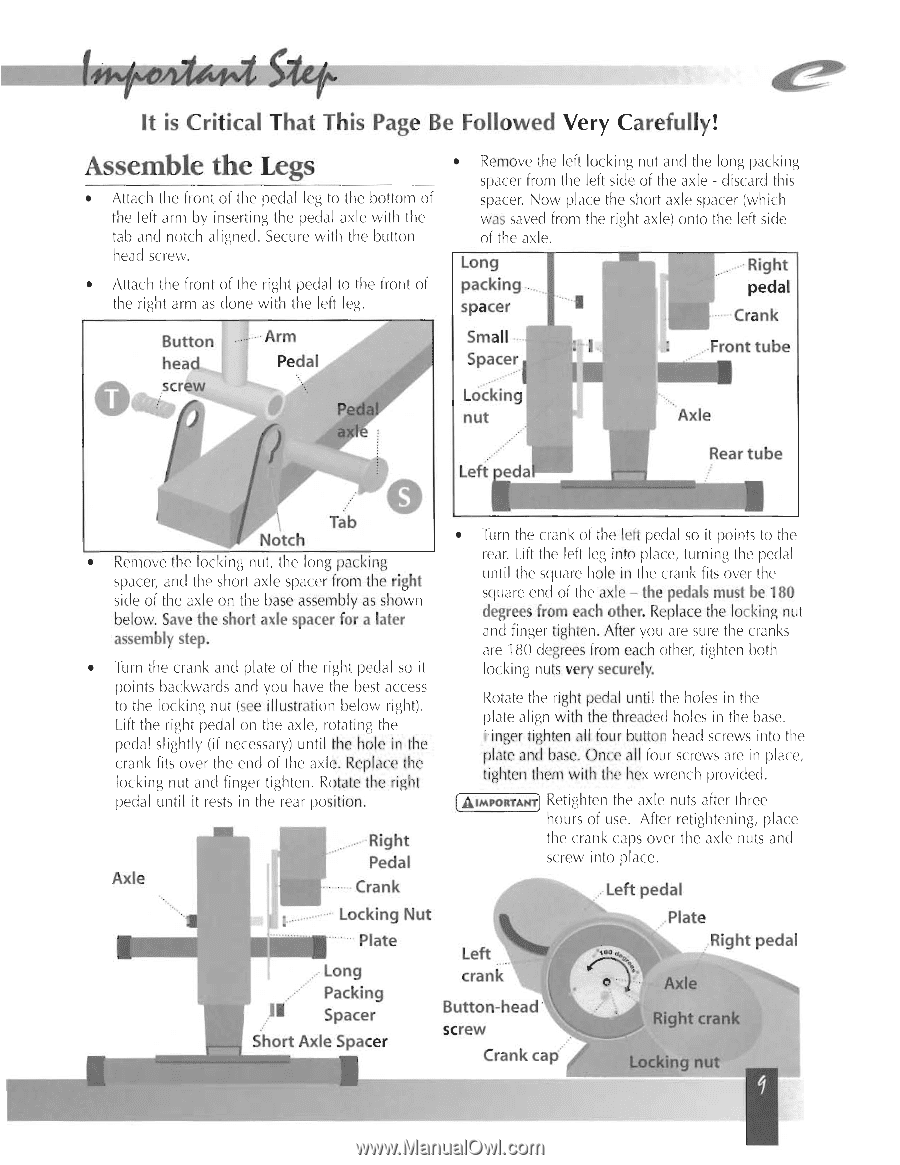
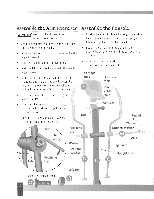
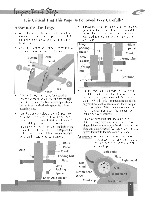
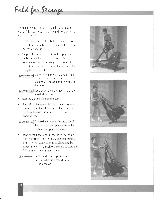
Iii+94444 57tec.i It is Critical That This Page Be Followed Very Carefully! Assemble the Legs • Attach the front of the pedal leg to the bottom of 'he lei) arm by inserting the pedal axle with the tab and notch aligned. Secure with the button head screw. • Altach the front of the right pedal 10 the front of the right arm as done with the left leg. Button head screw Arm Pedal • Remove the left locking nut and the long packing spacer from the left side of the axle - discard this spacer. Now place the short axle spacer (which was saved from the right axle) onto the left side of the axle. Long packing spacer Right pedal Crank Small Spacer Front tube Locking nut Axle Left • eda Rear tube -H*S° E r Tab Notch • Remove the locking nut, the long packing spacer, and the short axle spacer from the right side of the axle on the base assembly as shown below. Save the short axle spacer for a later assembly step. • Turn the crank and plate of the right pedal so it points backwards and you have the best access 10 the locking ow (see illustration below right). Lift the right pedal on the axle, rotating the pedal slightly (if necessary) until the hole in ihe crank fits over the end of the axle. Replace the locking nut and finger tighten. Rotate the right pedal until it rests in the rear position. . . Right Pedal Axle Crank • Turn the crank of the left pedal so it points to the rear. Lift the left leg into place, turning the pedal until the square hole in the crank tits over the square end of the axle - the pedals must he 180 degrees from each other. Replace the locking nut and finger tighten. After you are sure the cranks are 180 degrees from each other, tighten both locking nuts very securely. Rotate the right pedal until the holes in the plate align with the threaded holes in the base. Finger tighten all four button head screws into the plate and base. Once all four screws are in place, tighten them with the hex wrench provided. AP-O--R-TTP141' Retighten the axle nuts after three hours of use. After retightening, place the crank caps over the axle nuts and screw into place. ...Left pedal Locking Nut Plate Plate Long Packing 11 Spacer Short Axle Spacer Left crank Button-head screw Crank cap. Right pedal 0. Axle Right crank Locking nut
-
 1
1 -
2
-
3
-
4
-
5
-
 6
6 -
 7
7 -
 8
8 -
 9
9 -
 10
10 -
 11
11 -
 12
12 -
 13
13 -
 14
14 -
 15
15 -
 16
16
 |
 |