NordicTrack Reflex 8500 Pro Treadmill English Manual - Page 11
Lower the treadmill see HOW TO LOWER
 |
View all NordicTrack Reflex 8500 Pro Treadmill manuals
Add to My Manuals
Save this manual to your list of manuals |
Page 11 highlights
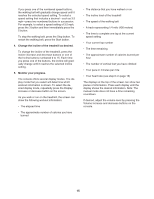
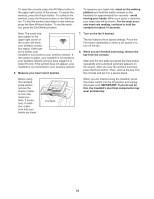
9. Place the treadmill in the storage position (see HOW TO FOLD THE TREADMILL on page 24). 9 Position the Base Plate (97) on the treadmill as shown. Attach the Base Plate to the Uprights (43) with two 3/8" x 1 3/4" Bolts (3). Note: It may be helpful if a second person tips the treadmill slightly as you tighten the Bolts. Lower the treadmill (see HOW TO LOWER THE TREADMILL FOR USE on page 25). 3 3 97 43 10. Make sure that all parts are properly tightened before you use the treadmill. Keep the included hex key in a secure place; the hex key is used to adjust the walking belt (see pages 27 and 28). To protect the floor or carpet from damage, place a mat under the treadmill. 11
-
 1
1 -
2
-
3
-
4
-
5
-
 6
6 -
 7
7 -
 8
8 -
 9
9 -
 10
10 -
 11
11 -
 12
12 -
 13
13 -
 14
14 -
 15
15 -
 16
16 -
17
-
18
-
19
-
20
-
21
-
22
-
23
-
24
-
25
-
26
-
27
-
28
-
29
-
30
-
31
-
32
-
33
-
34
-
35
-
36
 |
 |

11
9. Place the treadmill in the storage position (see
HOW TO FOLD THE TREADMILL on page 24).
Position the Base Plate (97) on the treadmill as
shown. Attach the Base Plate to the Uprights
(43) with two 3/8" x 1 3/4" Bolts (3). Note: It may
be helpful if a second person tips the treadmill
slightly as you tighten the Bolts.
Lower the treadmill (see HOW TO LOWER THE
TREADMILL FOR USE on page 25).
9
97
3
3
43
10.
Make sure that all parts are properly tightened before you use the treadmill.
Keep the included hex key
in a secure place; the hex key is used to adjust the walking belt (see pages 27 and 28).
To protect the floor
or carpet from damage, place a mat under the treadmill.