NordicTrack S 1900 Treadmill English Manual - Page 8
Note: The Left Accessory Tray 38 and the Right
 |
View all NordicTrack S 1900 Treadmill manuals
Add to My Manuals
Save this manual to your list of manuals |
Page 8 highlights
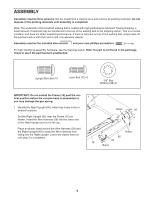
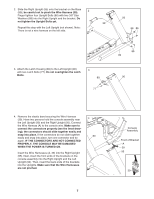
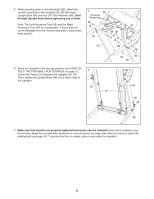
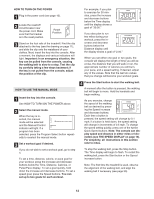
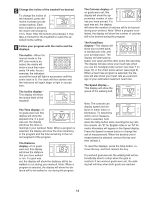
5. While pressing down on the Handrails (62), attach the console assembly to the Uprights (90, 95) with eight Upright Bolts (86) and four 3/8" Star Washers (88). Start all eight Upright Bolts before tightening any of them. 5 38 Console Assembly 86 Note: The Left Accessory Tray (38) and the Right 43 Accessory Tray (43) are replaceable. If these parts be- come dislodged from the console assembly, simply press them back in. 62 88 86 90 88 6. Place the treadmill in the storage position (see HOW TO FOLD THE TREADMILL FOR STORAGE on page 27). 6 Center the Frame (16) between the Uprights (90, 95). Then, tighten the Upright Bolts (86) in the lower ends of the Uprights. 90 16 62 86 95 95 86 86 86 7. Make sure that all parts are properly tightened before you use the treadmill. Note: Extra hardware may be included. Keep the included allen wrenches in a secure place; the large allen wrench is used to adjust the walking belt (see page 30). To protect the floor or carpet, place a mat under the treadmill. 8
-
 1
1 -
2
-
 3
3 -
 4
4 -
 5
5 -
 6
6 -
 7
7 -
 8
8 -
 9
9 -
 10
10 -
 11
11 -
 12
12 -
 13
13 -
14
-
15
-
16
-
17
-
18
-
19
-
20
-
21
-
22
-
23
-
24
-
25
-
26
-
27
-
28
-
29
-
30
-
31
-
32
-
33
-
34
-
35
-
36
-
37
-
38
 |
 |
