NordicTrack X22i Instruction Manual
NordicTrack X22i Manual
 |
View all NordicTrack X22i manuals
Add to My Manuals
Save this manual to your list of manuals |
NordicTrack X22i manual content summary:
- NordicTrack X22i | Instruction Manual - Page 1
No. Write the serial number in the space above for reference. Serial Number Decal CUSTOMER SERVICE UNITED KINGDOM Call: 0330 123 1045 From Ireland: 053 92 36102 Website: iconsupport.eu 2153 AUSTRALIA CAUTION Read all precautions and instructions in this manual before using this equipment. Save this - NordicTrack X22i | Instruction Manual - Page 2
ASSEMBLY 7 THE CHEST HEART RATE MONITOR 12 HOW TO USE THE INCLINE TRAINER 13 HOW TO MOVE THE INCLINE TRAINER 25 MAINTENANCE AND TROUBLESHOOTING manual and request a free replacement decal. Apply the decal in the location shown. Note: The decals may not be shown at actual size. NORDICTRACK and - NordicTrack X22i | Instruction Manual - Page 3
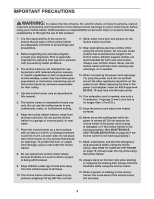
important precautions and instructions in this manual and all warnings persons with pre-existing health problems. 3. The incline trainer the incline trainer. Athletic support clothes are recommended for both not working properly. (See MAINTENANCE AND TROUBLESHOOTING on page 26 if the incline trainer - NordicTrack X22i | Instruction Manual - Page 4
Do not attempt to move the incline trainer until it is properly assembled. (See ASSEMBLY on page 7, and HOW TO MOVE THE INCLINE TRAINER on page manual. Never remove the motor hood unless instructed to do so by an authorized service representative. Servicing other than the procedures in this manual - NordicTrack X22i | Instruction Manual - Page 5
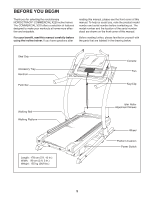
YOU BEGIN Thank you for selecting the revolutionary NORDICTRACK® COMMERCIAL X22I incline trainer. The COMMERCIAL X22I offers a selection of features designed to make your workouts at home more effective and enjoyable. For your benefit, read this manual carefully before using the incline trainer. If - NordicTrack X22i | Instruction Manual - Page 6
parentheses below each drawing is the key number of the part, from the PART LIST near the end of this manual. The number following the key number is the quantity used for assembly. Note: If a part is not in the hardware kit, check to see whether it is preattached. Extra parts may - NordicTrack X22i | Instruction Manual - Page 7
Do not dispose of the packing materials until you finish all assembly steps. • Assembly requires the following tools: the included hex keys • After you do not have internet access, call Customer Service (see the front cover of this manual). To register your product and activate your warranty in - NordicTrack X22i | Instruction Manual - Page 8
2. Make sure that the power cord is unplugged. 2 Remove the four 3/8" x 3 1/4" Screws (18) from the Base (74) (only one side is shown). Save the Screws. 18 74 3. Remove the four 3/8" x 2 3/4" Screws (22) from the Uprights (83). Save the Screws. 3 83 22 22 8 - NordicTrack X22i | Instruction Manual - Page 9
4. Set the Uprights (83) on the Base (74). Make sure that the hole with the Upright Wire (75) 4 is on the right side. Attach the right Upright (83) with two of the 3/8" x 3 1/4" Screws (18) and two of the 3/8" x 2 3/4" Screws (22) that you just removed and four 3/8" Star Washers (3); do not fully - NordicTrack X22i | Instruction Manual - Page 10
65). Do not tighten the Screws yet. 65 85 C E 7. With the help of a second person, set the handrail assembly (D) on the console assembly (F). 7 Attach the handrail assembly (D) with four 3/8" x 5 1/2" Screws (1) and four 3/8" Star Washers (3) (only one side is shown); start all four Screws, and - NordicTrack X22i | Instruction Manual - Page 11
8. Slide the Right Inside Upright Cover (70) against the lower end of the right Upright (83). Then, press the Right Outside Upright Cover (71) against the Right Inside Upright Cover until it snaps into place. Make sure that the wires (G) are not pinched. Attach the Left Inside Upright Cover (not - NordicTrack X22i | Instruction Manual - Page 12
the chest strap. Adjust the length of the chest strap, if necessary. TROUBLESHOOTING • If the heart rate monitor does not function when positioned as described with people who have normal heart rhythms. Heart rate reading problems may be caused by medical conditions such as premature ventricular - NordicTrack X22i | Instruction Manual - Page 13
HOW TO USE THE INCLINE TRAINER HOW TO PLUG IN THE POWER CORD This product must be earthed. If it should malfunction or break down, earthing provides a path of least resistance for electric current to reduce the risk of electric shock. This product's power cord has an equipment-earthing conductor - NordicTrack X22i | Instruction Manual - Page 14
track your workout results, and access many other features. When you use the manual mode, you can change the speed and incline of the incline trainer with the controls the speed and incline of the incline trainer as it guides you through an effective exercise session. You can even listen to - NordicTrack X22i | Instruction Manual - Page 15
in either miles or kilometres. To find which unit of measurement is selected, see HOW TO CHANGE CONSOLE SETTINGS on page 21. For simplicity, all instructions in this section refer to kilometres. 15 - NordicTrack X22i | Instruction Manual - Page 16
iFit account. 4. Tour the console. The first time you turn on the incline trainer, dialogue boxes on the screen will guide you through the features of the console. To use the manual mode, see page 17. To use a map workout, see page 18. To use a draw your own map workout, see page - NordicTrack X22i | Instruction Manual - Page 17
HOW TO USE THE MANUAL MODE 1. Insert the key into the console. See HOW TO TURN ON THE on the screen to return to the main menu. 3. Start the walking belt and adjust the speed. Touch the Manual Start button on the screen or press the Start button on the console to start the walking belt. The walking - NordicTrack X22i | Instruction Manual - Page 18
• The average speed of the walking belt HOW TO USE A MAP WORKOUT • A track representing 400 m (1/4 mile) If desired, adjust the volume by pressing the volume buttons on the console. To pause the workout, tap the screen or press the Stop button on the console. To continue the workout, touch the - NordicTrack X22i | Instruction Manual - Page 19
5. Monitor your progress with the display modes. See step 5 on page 17. 6. Measure your heart rate if desired. See step 6 on page 18. 7. Turn on the fan if desired. See step 7 on page 18. 8. When you are finished exercising, remove the key from the console. See step 8 on page 18. HOW TO USE A DRAW - NordicTrack X22i | Instruction Manual - Page 20
HOW TO USE A DISTANCE OR TIME WORKOUT Note: To use a distance or time workout, the console must be connected to a wireless network (see HOW TO USE THE WIRELESS NETWORK MODE on page 23). An iFit account is also required. 1. Add workouts to your schedule on iFit.com. 5. Select a distance or time - NordicTrack X22i | Instruction Manual - Page 21
touch Finish to return to the main menu. 4. Grip the push bar or the sled grips with both hands (see page 5). 5. Use your body to manually move the walking belt at the desired speed. Next, touch the profile button (person symbol) on the screen, and then touch Settings. The settings menu - NordicTrack X22i | Instruction Manual - Page 22
3. Customize the unit of measurement and other settings. To customize the unit of measurement, the time zone, or other settings, touch Equipment Settings, and then touch the desired settings. The console can display speed and distance in either standard or metric units of measurement. 4. View - NordicTrack X22i | Instruction Manual - Page 23
having problems connecting to an encrypted network, make sure that your password is correct. Note: Passwords are case-sensitive. Note: The console supports speed. Note: If you have questions after following these instructions, go to support.iFit.com for assistance. 5. Exit the wireless network mode - NordicTrack X22i | Instruction Manual - Page 24
HOW TO USE THE SOUND SYSTEM WITH A BLUETOOTH DEVICE HOW TO USE THE SOUND SYSTEM WITH AN AUDIO CABLE 1. Place or hold your Bluetooth-enabled device near the console. 2. Turn on your device's Bluetooth setting. 3. Pair your device to the console. Press and hold the Bluetooth button on the console's - NordicTrack X22i | Instruction Manual - Page 25
HOW TO MOVE THE INCLINE TRAINER Before moving the incline trainer, insert the key into the console (A), raise the incline to the maximum incline level, remove the key, and unplug the power cord. Due to the size and weight of the incline trainer, moving it requires two or three persons. Hold the - NordicTrack X22i | Instruction Manual - Page 26
incline trainer with a soft towel. TROUBLESHOOTING Most incline trainer problems can be solved by following the simple steps below. Find the symptom that applies, and follow the steps listed. If further assistance is needed, see the front cover of this manual - NordicTrack X22i | Instruction Manual - Page 27
the walking platform unless instructed to do so by an authorized service representative. Such substances may deteriorate the walking belt and cause excessive wear. If you suspect that the walking belt needs more lubricant, see the front cover of this manual - NordicTrack X22i | Instruction Manual - Page 28
foot rails (D) (see the drawing below). If necessary, follow the instructions below to align the walking belt. a. IMPORTANT: If the walking your wireless network are correct. c. If you still have questions, go to support.iFit.com. SYMPTOM: The incline of the incline trainer does not change correctly - NordicTrack X22i | Instruction Manual - Page 29
SYMPTOM: The console does not stay in place a. If the console will not stay in the desired position because it is too loose, use a hex key to slightly tighten the console in the indicated location on both sides (only one side is shown). a SYMPTOM: The displays of the console do not function - NordicTrack X22i | Instruction Manual - Page 30
especially important for persons over age 35 or persons with pre-existing health problems. The heart rate monitor is not a medical device. Various factors may key to achieving results. You can use your heart rate as a guide to find the proper intensity level. The chart below shows recommended heart - NordicTrack X22i | Instruction Manual - Page 31
SUGGESTED STRETCHES The correct form for several basic stretches is shown at the right. Move slowly as you stretch-never bounce. 1. Toe Touch Stretch Stand with your knees bent slightly and slowly bend forward from your 1 hips. Allow your back and shoulders to relax as you reach down toward - NordicTrack X22i | Instruction Manual - Page 32
NOTES 32 - NordicTrack X22i | Instruction Manual - Page 33
Screw 3/8" x 3 1/4" Screw 3/8" Washer 5/16" Motor Bolt 3/8" x 2 3/8" Screw 3/8" x 2 3/4" Screw #8 Star Washer Console Back 5/16" Flat Washer 3/8" Nut 5/16" Nut 1/4" Nut Belt Guide Walking Platform Walking Belt Left Foot Rail Right Foot Rail Idler Roller Belly Pan Cover Belly Pan Power Switch Belly - NordicTrack X22i | Instruction Manual - Page 34
Screw Motor Isolator Motor Bushing Key No. Qty. 108 2 109 1 110 1 111 1 112 1 * - Description 5/16" Washer #8 Nut Filter Magnet Ferrite Box User's Manual Note: Specifications are subject to change without notice. For information about ordering replacement parts, see the back cover of this - NordicTrack X22i | Instruction Manual - Page 35
35 8 10 11 111 46 44 5 43 5 29 6 8 10 30 31 11 8 10 32 33 11 34 8 10 5 11 5 8 10 55 38 41 16 42 16 8 5 6 10 5 5 29 7 35 5 16 16 5 16 40 16 5 36 39 37 16 5 38 5 Model No. NETL27719.0 R0819A EXPLODED DRAWING A - NordicTrack X22i | Instruction Manual - Page 36
EXPLODED DRAWING B 47 13 5 49 36 5 50 51 4 49 5 53 13 49 25 50 48 51 103 49 66 105 53 104 4 20 5 49 50 59 51 26 19 59 49 27 49 53 50 25 27 51 49 25 27 13 106 10 107 108 19 14 7 7 54 63 7 64 17 17 17 28 10 53 62 61 17 60 26 19 55 23 25 17 23 - NordicTrack X22i | Instruction Manual - Page 37
37 21 68 73 9 69 78 81 45 80 52 76 79 12 45 77 45 76 81 12 79 45 77 72 26 73 9 74 76 73 72 26 21 73 9 52 9 70 78 71 Model No. NETL27719.0 R0819A EXPLODED DRAWING C - NordicTrack X22i | Instruction Manual - Page 38
EXPLODED DRAWING D Model No. NETL27719.0 R0819A 100 90 3 15 57 102 5 57 57 102 31 57 5 57 102 98 2 102 5 2 17 99 84 3 2 101 2 3 1 1 83 89 2 82 18 86 65 87 18 3 100 3 3 22 3 22 3 85 97 18 3 86 87 65 101 18 3 75 3 22 38 - NordicTrack X22i | Instruction Manual - Page 39
EXPLODED DRAWING E 91 92 7 7 5 93 Model No. NETL27719.0 R0819A 5 5 5 94 7 7 5 5 88 24 5 96 5 5 5 5 5 41 96 41 5 5 5 95 41 5 67 95 5 41 5 5 95 5 5 95 39 - NordicTrack X22i | Instruction Manual - Page 40
) • the key number and description of the replacement part(s) (see the PART LIST and the EXPLODED DRAWING near the end of this manual) RECYCLING INFORMATION This electronic product must not be disposed of in municipal waste. To preserve the environment, this product must be recycled after its useful
-
 1
1 -
 2
2 -
 3
3 -
 4
4 -
 5
5 -
 6
6 -
 7
7 -
8
-
9
-
10
-
11
-
12
-
13
-
14
-
15
-
16
-
17
-
18
-
19
-
20
-
21
-
22
-
23
-
24
-
25
-
26
-
27
-
28
-
29
-
30
-
31
-
32
-
33
-
34
-
35
-
36
-
37
-
38
-
39
-
40
 |
 |

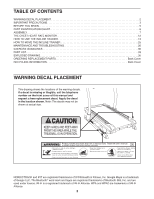
USER’S MANUAL
iconeurope.eu
Model No. NETL27719.0
Serial No.
Write the serial number in the space
above for reference.
CAUTION
Read all precautions and
instructions in this manual before
using this equipment. Save this
manual for future reference.
CUSTOMER SERVICE
UNITED KINGDOM
Call:
0330 123 1045
From Ireland:
053 92 36102
Website:
iconsupport.eu
E-mail:
Write:
ICON Health & Fitness, Ltd.
Unit 4, Westgate Court
Silkwood Park
OSSETT
WF5 9TT
UNITED KINGDOM
AUSTRALIA
Call:
1800 993 770
E-mail:
Write:
ICON Health & Fitness
PO Box 635
WINSTON HILLS NSW 2153
AUSTRALIA
Serial
Number
Decal