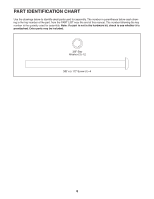
NordicTrack X22i Instruction Manual - Page 11
Attach the Left Inside Upright Cover
 |
View all NordicTrack X22i manuals
Add to My Manuals
Save this manual to your list of manuals |
Page 11 highlights
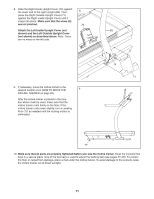
8. Slide the Right Inside Upright Cover (70) against the lower end of the right Upright (83). Then, press the Right Outside Upright Cover (71) against the Right Inside Upright Cover until it snaps into place. Make sure that the wires (G) are not pinched. Attach the Left Inside Upright Cover (not shown) and the Left Outside Upright Cover (not shown) as described above. Note: There are no wires on the left side. 8 70 9. If necessary, move the incline trainer to the desired location (see HOW TO MOVE THE 9 INCLINE TRAINER on page 25). After the incline trainer is placed in the location where it will be used, make sure that the incline trainer rests firmly on the floor. If the incline trainer rocks even slightly, turn a Leveling Foot (77) as needed until the rocking motion is eliminated. 83 G 71 77 10. Make sure that all parts are properly tightened before you use the incline trainer. Keep the included hex keys in a secure place. One of the hex keys is used to adjust the walking belt (see pages 27-28). To protect the floor or carpet from damage, place a mat under the incline trainer. To avoid damage to the console, keep the incline trainer out of direct sunlight. 11
-
 1
1 -
2
-
3
-
4
-
5
-
 6
6 -
 7
7 -
 8
8 -
 9
9 -
 10
10 -
 11
11 -
 12
12 -
 13
13 -
 14
14 -
 15
15 -
 16
16 -
17
-
18
-
19
-
20
-
21
-
22
-
23
-
24
-
25
-
26
-
27
-
28
-
29
-
30
-
31
-
32
-
33
-
34
-
35
-
36
-
37
-
38
-
39
-
40
 |
 |
