Oki MPS480mb MPS730b Setup Guide (English, Fran栩s) - Page 8
Internet Communication, Features
 |
View all Oki MPS480mb manuals
Add to My Manuals
Save this manual to your list of manuals |
Page 8 highlights
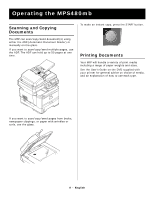
Internet Communication Features Pre-Installation Information The MFP has to be set up properly on your network to perform scan to e-mail and other functions. In order for other network devices to find the MFP on the network, the following network parameters have to be set: 1. IP Address Set: 2. IP Address: . . . 3. Subnet mask: . . . 4. Gateway IP: . . . 5. DNS server: . . . 6. SMTP server: . . . 7. SMTP port: 25 8. POP3 server: . . . 9. POP3 Port: 110 For an Explanation of these settings, see the online User's Guide on the DVD. Scan to E-mail The MFP allows you to deliver your scanned document to e-mail addresses on the network. The document is first scanned and converted to a standard PDF, JPEG, or TIFF file format and then transmitted to remote recipients simultaneously as an e-mail attachment. When you send an e-mail to someone using this MFP it uses Simple Mail Transfer Protocol (SMTP) to transfer your outgoing e-mails to your SMTP mail server, and then send these e-mails to your recipients via the internet. Setting up an SMTP Server This section explains setting up an SMTP server. 1. Using the Down arrow keys, scroll to the Menu function and press Enter. 2. Using the Down arrow key, scroll to Admin Setup and press Enter. 3. Using the arrow keys and on-screen keypad, enter the Administrator password. Highlight Done and press Enter. 4. Using the Down arrow key, scroll to Network Setup and press Enter. 5. Using the Down arrow key, scroll to Mail Server Setup and press Enter. 6. Press Enter to select SMTP server and then press Enter again. 7. Enter your IP address. Numbers are entered using the Ten Key pad. When a number is entered from the Ten Key pad, the number currently displayed is cleared and the number just entered is displayed as the first digit. When another number is entered, the number in the first digit moves to the next, and so on. 8. To confirm, press the Enter key. To cancel the IP address, move the cursor to the first field and then press the Left arrow key. 8 - English
-
 1
1 -
2
-
 3
3 -
 4
4 -
 5
5 -
 6
6 -
 7
7 -
 8
8 -
 9
9 -
 10
10 -
 11
11 -
 12
12 -
 13
13 -
14
-
15
-
16
-
17
-
18
-
19
-
20
-
21
-
22
-
23
-
24
-
25
-
26
-
27
-
28
 |
 |