Olympus E-PL1 E-PL1 Instruction Manual (English) - Page 7
Setting the date/time - pictures
 |
UPC - 050332173231
View all Olympus E-PL1 manuals
Add to My Manuals
Save this manual to your list of manuals |
Page 7 highlights
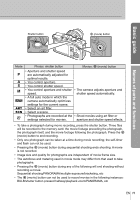
Basic guide Preparations for shooting Setting the date/time Date and time information is recorded on the card together with the images. The file name is also included with the date and time information. Be sure to set the correct date and time before using the camera. 1 Display the menus. • Press the MENU button to display the menus. MENU button CARD SETUP CUSTOM RESET PICTURE MODE j K IMAGE ASPECT 4:3 2 Select [X] in the [d] (setup) tab. • Use FG to select [d] and press I. [d] tab 3 Set the date and time. • Use HI to select items. • Use FG to change the selected item. • Use FG to select the date format. BACK SET X W s ENG. j±0 k±0 REC VIEW 5SEC c MENU DISPLAY OFF FIRMWARE BACK SET X Y M D TIME 2010 Y/M/D CANCEL The time is displayed using a 24-hour clock. 4 Save settings and exit. • Press i to set the camera clock and exit to the main menu. • Press the MENU button to exit the menus. EN 7
-
 1
1 -
 2
2 -
 3
3 -
 4
4 -
 5
5 -
 6
6 -
 7
7 -
 8
8 -
 9
9 -
 10
10 -
 11
11 -
 12
12 -
13
-
14
-
15
-
16
-
17
-
18
-
19
-
20
-
21
-
22
-
23
-
24
-
25
-
26
-
27
-
28
-
29
-
30
-
31
-
32
-
33
-
34
-
35
-
36
-
37
-
38
-
39
-
40
-
41
-
42
-
43
-
44
-
45
-
46
-
47
-
48
-
49
-
50
-
51
-
52
-
53
-
54
-
55
-
56
-
57
-
58
-
59
-
60
-
61
-
62
-
63
-
64
-
65
-
66
-
67
-
68
-
69
-
70
-
71
-
72
-
73
-
74
-
75
-
76
-
77
-
78
-
79
-
80
-
81
-
82
-
83
-
84
-
85
-
86
-
87
-
88
-
89
-
90
-
91
-
92
-
93
-
94
-
95
-
96
-
97
-
98
-
99
-
100
-
101
-
102
-
103
-
104
-
105
-
106
-
107
-
108
-
109
-
110
-
111
-
112
-
113
-
114
-
115
-
116
-
117
-
118
-
119
-
120
-
121
-
122
-
123
-
124
 |
 |
