Olympus E-PM1 E-PM1 Instruction Manual (English) - Page 61
Shooting and viewing movies, Changing the settings for movie recording
 |
View all Olympus E-PM1 manuals
Add to My Manuals
Save this manual to your list of manuals |
Page 61 highlights
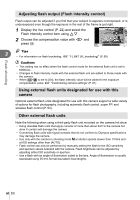
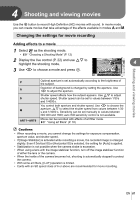
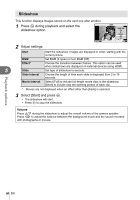
4 Shooting and viewing movies Use the R button to record High Definition (HD) movies with sound. In movie mode, you can create movies that take advantage of the effects available in modes A and M. Changing the settings for movie recording Adding effects to a movie 1 Select n as the shooting mode. • g "Choosing a Shooting Mode" (P. 12) 2 Display the live control (P. 22) and use FG to highlight the shooting mode. 3 Use HI to choose a mode and press Q. Program Auto n PASM IS OFF P WB AUTO S-AF ISO AUTO HD 4 Shooting and viewing movies P A S M ART1 - ART6 Optimal aperture is set automatically according to the brightness of the subject. Depiction of background is changed by setting the aperture. Use HI to adjust the aperture. Shutter speed affects how the subject appears. Use FG to adjust shutter speed. Shutter speed can be set to values between 1/30 s and 1/4000 s. You control both aperture and shutter speed. Use HI to choose the aperture, FG to select the shutter speed from values between 1/30 s and 1/4000 s. Sensitivity can be set manually to values between ISO 400 and 1600; auto ISO sensitivity control is not available. Movie can be recorded with effects of art filter mode. g "Using art filters" (P. 18) # Cautions • When recording a movie, you cannot change the settings for exposure compensation, aperture value, and shutter speed. • If [Image Stabilizer] is activated while recording a movie, the recorded image is enlarged slightly. Even if [Vertical IS] or [Horizontal IS] is selected, the setting for [Auto] is applied. • Stabilization is not possible when the camera shake is excessive. • When using a lens with the image stabilizer function, turn off the image stabilizer function of either the lens or the camera. • When the inside of the camera becomes hot, shooting is automatically stopped to protect the camera. • With some art filters, [C-AF] operation is limited. • Cards with an SD speed class of 6 or above are recommended for movie recording. EN 61
-
 1
1 -
2
-
3
-
4
-
5
-
6
-
7
-
8
-
9
-
10
-
11
-
12
-
13
-
14
-
15
-
16
-
17
-
18
-
19
-
20
-
21
-
22
-
23
-
24
-
25
-
26
-
27
-
28
-
29
-
30
-
31
-
32
-
33
-
34
-
35
-
36
-
37
-
38
-
39
-
40
-
41
-
42
-
43
-
44
-
45
-
46
-
47
-
48
-
49
-
50
-
51
-
52
-
53
-
54
-
55
-
 56
56 -
 57
57 -
 58
58 -
 59
59 -
 60
60 -
 61
61 -
 62
62 -
 63
63 -
 64
64 -
 65
65 -
 66
66 -
67
-
68
-
69
-
70
-
71
-
72
-
73
-
74
-
75
-
76
-
77
-
78
-
79
-
80
-
81
-
82
-
83
-
84
-
85
-
86
-
87
-
88
-
89
-
90
-
91
-
92
-
93
-
94
-
95
-
96
-
97
-
98
-
99
-
100
-
101
-
102
-
103
-
104
-
105
-
106
-
107
-
108
-
109
-
110
-
111
-
112
-
113
-
114
-
115
-
116
-
117
-
118
-
119
-
120
-
121
-
122
-
123
-
124
-
125
-
126
-
127
-
128
-
129
 |
 |
