Olympus VN-801PC VN-801PC Instructions (English) - Page 2
Getting started - recorder
 |
View all Olympus VN-801PC manuals
Add to My Manuals
Save this manual to your list of manuals |
Page 2 highlights
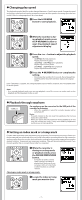
Getting started h Identification of parts 1 2 3 % 6 4 $ # 7 @ 8 ! 9 0 5 * ( ^ & 1 EAR (Earphone) jack 2 MIC (Microphone) jack 3 Built-in microphone 4 Recording indicator light 5 Built-in speaker 6 + button 7 REC (s) (Record) button 8 9button 9 FOLDER/INDEX/SCENE button 0 - button ! ERASE button @ `OK/MENU button # 0 button $ STOP (4) button % Display (LCD panel) ^ POWER/HOLD switch & USB connector * Battery cover ( Strap hole Display (LCD panel): The displayed character size on the screen can be changed. (please see "Font Size" ☞ P.13) When the [Font Size] is set to [Large]. 1 6 2 7 3 8 4 9 5 0 When the [Font Size] is set to [Small]. ! 7 2 6 8 1 @ 3 4 9 # 5 0 1 Current file number/ Total number of recorded files in the folder 2 Folder indicator 3 Recorder status indicator 4 During recording mode: Elapsed recording time During playback mode: Elapsed playback time 5 [?] Microphone Sensitivity indicator [!] VCVA indicator 6 File lock indicator 7 Battery indicator 8 Recording mode indicator 9 During recording mode: Remaining recording time During playback or stop mode: File length 0 Playback mode indicator ! File name* @ During recording mode: Remaining memory bar indicator* During playback or stop mode: Playback position bar indicator* # Recording date and time* * This item will be displayed when the [Font Size] is set to [Small] only. h Inserting batteries 1 Lightly press down on the arrow and slide the battery cover open. • Manganese batteries may not be used in this recorder. • Be sure to stop the recorder before replacing the batteries. Unloading the batteries while the recorder is in use may cause a malfunction such as corrupting the file, etc. -2-
-
 1
1 -
 2
2 -
 3
3 -
 4
4 -
 5
5 -
 6
6 -
 7
7 -
 8
8 -
9
-
10
-
11
-
12
-
13
-
14
-
15
-
16
-
17
-
18
 |
 |
