Olympus VN-801PC VN-801PC Instructions (English) - Page 4
About recording
 |
View all Olympus VN-801PC manuals
Add to My Manuals
Save this manual to your list of manuals |
Page 4 highlights
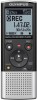
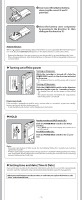
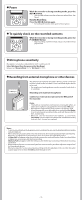
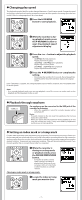
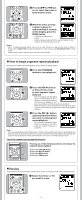
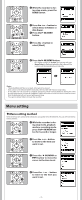
1 Press the 9 or 0 button to select the item to set. • Select the item from the "hour", "minute", "year", "month" and "day" with a flashing point. 2 Press the + or - button to set. • Follow the same steps by pressing the 9 or 0 button to select the next item, and press the + or − button to set. • You can select between 12 and 24 hour display by pressing the FOLDER/INDEX/SCENE button while setting the hour and minute. • You can select the order of the "month", "day" and "year" by pressing the FOLDER/INDEX/SCENE button while setting them. 3 Press the ` OK/MENU button to complete the setting. • The clock will start from the set date and time. Press the ` OK/MENU button according to the time signal. • While the recorder is during stop mode, press and hold the STOP (4) button to display the [Time & Date], and [Remain]. Changing the time and date Select [Time & Date] from the menu on the [Device Menu]. (please see "Menu setting" ☞ P.9, "Time & Date" ☞ P.14) h Notes on the Folders The recorder provides five folders, [F], [G], [H], [I] and [W]. To change the folder selection, press the FOLDER/INDEX/SCENE button while the a recorder is stopped. a Folder indicator Note: • Each folder can store up to 200 files. About recording h Recording Before starting recording, select a folder between [&] to [*]. These five folders can be selectively used to distinguish the kind of recording; for example, Folder [&] might be used to store private information, while Folder ['] might be dedicated to holding business information. 1 Press the FOLDER/INDEX/ SCENE button to select the a desired folder. a Folder indicator • Newly recorded audio will be saved as the last file in the selected folder. 2 Press the REC (s) button to start recording. b • Turn the microphone in the direction of the source to be recorded. c b Recording mode/ c Elapsed recording time/ d Remaining d recording time • [Rec Mode] cannot be changed in the recording standby mode or while recording. Configure this while the recorder is stopped. 3 Press the STOP (4) button to stop recording. e File length e Note: • If a recording is made in stereo modes ([192 kbps] or [128 kbps]), it will be a monaural recording through the built-in microphone, and the same audio will be recorded on both Left channel (Lch) and Right channel (Rch). -4-
-
 1
1 -
 2
2 -
 3
3 -
 4
4 -
 5
5 -
 6
6 -
 7
7 -
 8
8 -
 9
9 -
 10
10 -
11
-
12
-
13
-
14
-
15
-
16
-
17
-
18
 |
 |
