Olympus VN-801PC VN-801PC Instructions (English) - Page 3
Turning on/off the power, Setting time and date [Time & Date]
 |
View all Olympus VN-801PC manuals
Add to My Manuals
Save this manual to your list of manuals |
Page 3 highlights
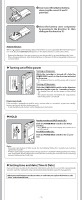
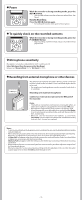
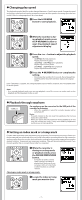
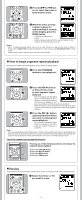
2 Insert size-AAA alkaline battery, observing the correct = and polarities. 3 Close the battery cover completely by pressing to the direction A, then sliding to the direction B. Battery indicator: When [ ] appears on the display, replace the batteries as soon as possible. When the batteries are too weak, [s] and [Battery Low] appears on the display and the recorder shuts down. • Remove the batteries if you are not going to use the recorder for an extended period of time. • When changing batteries, AAA alkaline batteries or Olympus Ni-MH rechargeable batteries are recommended. h Turning on/off the power Turning on the power: While the recorder is turned off, slide the POWER/HOLD switch in the direction indicated by the arrow. • The display will turn on, and the power will be turned on. Turning off the power: Slide the POWER/HOLD switch in the direction indicated by the arrow for 1 seconds or longer. • The display shuts off, and the power will be turned off. • The resume function remembers the stop position before the power is turned off. Power save mode If the recorder is stopped/not used for over 5 minutes after it is turned on, it goes into standby (power-save) mode, and the display shuts off. • To exit standby mode and turn on the display, press any button. h HOLD A C B Set the recorder to HOLD mode (A): Slide the POWER/HOLD switch to the HOLD position. • After [Hold] appears on the display, the recorder is set to HOLD mode. Exit HOLD mode (B): Slide the POWER/HOLD switch to the C position. Notes: • If you press any button in HOLD mode, the clock display flashes for 2 seconds, but it will not operate the recorder. • If HOLD is applied during playback (recording), operation is disabled with the playback (recording) state unchanged (When playback has ended and the recording has ended due to the remaining memory being used up, it will stop). h Setting time and date [Time & Date] If you set the time and date beforehand, the information when the file is recorded is automatically stored for each file. Setting the time and date beforehand enables easier file management. When you install batteries for the first time or each time you replace the batteries, the "Hour" indication will flash. -3-
-
 1
1 -
 2
2 -
 3
3 -
 4
4 -
 5
5 -
 6
6 -
 7
7 -
 8
8 -
 9
9 -
10
-
11
-
12
-
13
-
14
-
15
-
16
-
17
-
18
 |
 |
