Onkyo TX-8511 Owner Manual - Page 12
Connecting, power
 |
View all Onkyo TX-8511 manuals
Add to My Manuals
Save this manual to your list of manuals |
Page 12 highlights
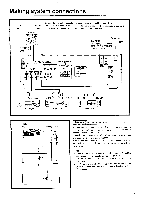
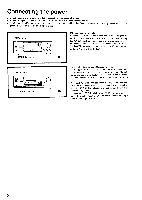
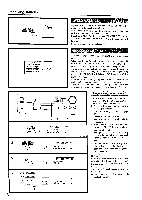
Connecting the power • Before plugging in the unit, confirm that all connections have been trade properly. • Before turning on the power, be sure that the VOLUME knob is fully turned counterclockwise. • Turning on this unit's power may cause a momentary power surge, which might interfere with other electrical equipment, such as com- puters. If so, use a wall outlet on a different circuit. POWER switch • STAND-BY indicator 000 U.S. and Canadian models: Plugging the TX-851 l's power cord into an AC outlet puts the unit in stand-by status (the STAND-BY indicator is lit). Pressing the POWER switch turns on the unit and lights up the display. If this switch is pressed again, the unit returns to the stand-by status. The POWER button on the remote control is used in the same way as the POWER switch on the TX-851 I. SYSTEM switch rI 1 000 STAND-BY indicator Models other than U.S. and Canadian models: After plugging the TX-8511's power cord into an AC outlet, press the SYSTEM switch to put the unit in power-on status (the unit can be operated and its display is lit). The remote control cannot be used to operate the TX-8511 if the SYSTEM switch is not set to ON. When the SYSTEM switch is set to ON, pressing the POWER button on the remote control switches the TX-85I I between stand-by status (the STAND-BY indicator is lit) and power-on status (the display will light up). Pressing the SYSTEM switch on the TX-851 I to set it to OFF turns off the unit. (When the SYSTEM switch is set to OFF, only a small amount of power is used.) 12
-
 1
1 -
2
-
3
-
4
-
5
-
6
-
 7
7 -
 8
8 -
 9
9 -
 10
10 -
 11
11 -
 12
12 -
 13
13 -
 14
14 -
 15
15 -
 16
16 -
 17
17 -
18
-
19
-
20
-
21
-
22
-
23
-
24
-
25
-
26
-
27
-
28
 |
 |
