Onkyo TX-8511 Owner Manual - Page 6
Power, Input, Selector, Tuner, Sleep, Muting, Volume
 |
View all Onkyo TX-8511 manuals
Add to My Manuals
Save this manual to your list of manuals |
Page 6 highlights
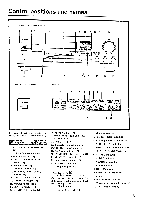
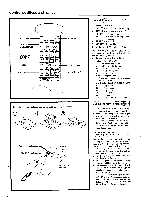
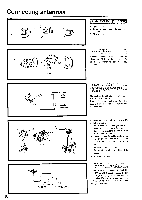
Control positions and names 1. POWER 2. INPUT SELECTOR 3. DECK A/ DECK-B 4. TUNER 5. CD POWER SLEEP INPUT SELECTOR n :fE nl • . :l. 1! bt DECK4 •,.. cfn -IMt DECICS CP ,±1 1. fY±-OCJ-W1L75n 1=1 A CI CI (= 4se VOLUME C] ONKYO REMOTE CONTROLLER RC-MS 6. SLEEP 7. MUTING 8. VOLUME Insert the batteries into the remote control according to the illustration. O O (-3O Remote control sensor STAND-BY indicator 30' 30* TX-8511 approx. 5 m (16 feet) 6 RernOte'COntrol' ' 1. POWER button [12] 2. INI'UT SELECTOR buttons [13] 4. TUNER operation buttons [17] GROUP : Group button 41PRESET ii.:Preset memory up/down buttons 6. SLEEP button [14] 7. MUTING button [14] 8. VOLUME A/V buttons [13, 26] When you have made the RI connections mentioned on page 7, you will be able to use the following buttons. 3. Tape deck operation buttons (DECK-A, DECK-B) ▪ :Reverse play button - : Forward play button : Fast rewind button :Fast forward button III : Stop button • : Rec/pause button * When only a single deck is used, operate DECK-B. 5. CI) player operation buttons (CD) • : Stop button II : Pause button :Play button 114 : Down button HI Up button DISC : Disc button fur CD changer Using the remote contrrir- The following information will help you get optimal use from the remote control. • Place this unit away from direct bright light which can prevent proper operation of the remote control. • Make sure audio rack doors do not have tinted glass. Placing this unit behind such a door may prevent proper remote control operation. iNnirorM?•ffp LwV/,i 4, 4w ?w, • Loading the batteries - Remove the battery compartment cover by opening it as shown in the illustration. Load two AA (R6 or UM-3)-size batteries into the remote control with the plus (+) and minus (-) terminals positioned as indicated by the diagram inside the battery compartment, then close the cover. • Imivediately remove empty batteries to avoid corrosion damage. • To avoid potential corrosion damage, never mix old batteries with new ones. • The manganese batteries supplied with this unit have a service life of approximately six months, depending on the frequency of use. • The TX-851I comes equipped with two AA (R6 or UM-3) manganese batteries, but we recommend that long-life AA (LRb or AM-3)-size alkaline batteries be used when replacing the batteries.
-
 1
1 -
 2
2 -
 3
3 -
 4
4 -
 5
5 -
 6
6 -
 7
7 -
 8
8 -
 9
9 -
 10
10 -
 11
11 -
 12
12 -
13
-
14
-
15
-
16
-
17
-
18
-
19
-
20
-
21
-
22
-
23
-
24
-
25
-
26
-
27
-
28
 |
 |
