Onkyo TX-NR5010 Owner Manual - Page 90
Using the Remote Controller in Zone and Multiroom Control Kits, En-90
 |
View all Onkyo TX-NR5010 manuals
Add to My Manuals
Save this manual to your list of manuals |
Page 90 highlights
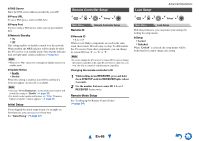
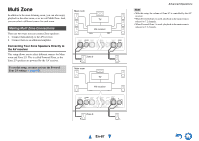
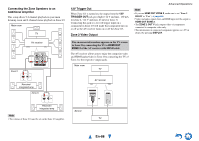
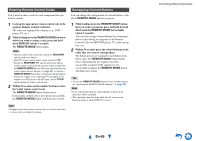
Muting Zones ■ Operating on the remote controller 1 Press ZONE repeatedly, and then press MUTING. Tip • To unmute, press ZONE followed by MUTING again. Zones can also be unmuted by adjusting the volume. Note • ZONE 2 LINE OUT and FRONT WIDE/ZONE 2 L/R output 2ch PCM and analog input sources. To listen to the PCM source, you need to make an HDMI connection (➔ page 21). If no sound is heard when an input source is selected, check if the source is connected to an analog input and HDMI input. • Only analog input sources are output by the ZONE 3 LINE OUT and FRONT HIGH/ZONE 3 L/R terminals. Digital input sources are not output. If no sound is heard when an input source is selected, verify that the source is connected to an analog input. • (North American models) You can select different radio stations for the main room and Zone 2 by connecting the supplied antennas respectively (➔ page 24). • (North American models) When the main room and Zone 2 share the same input source, if the input selector of the main room is TUNER, you cannot select different radio stations for the main room and Zone 2 respectively. • (European models) You cannot select different AM or FM radio stations for your main room and Zone 2/3. The same AM/FM radio station will be heard in each room. Namely, if you have selected an FM station for the main room, that station will also be output in Zone 2/3. • You cannot select different radio stations for Zone 2 and Zone 3 respectively. • If Zone 2 and the main room share the same input source, only an analog input signal is output. • If an HDMI component selected in Zone 2 outputs the sound other than PCM, the sound is not output from FRONT WIDE/ZONE 2 and ZONE 2 LINE OUT. • Both audio and video outputs from an HDMI component may interrupt when the main room and Zone 2 are set to share the same source or not. • When you have selected NET or USB as input selector, the last selector selected will be set for Main room and Zone 2/3. • When Zone 2/3 is activated and its input selector is selected, the power consumption of standby mode slightly increases. • While Zone 2/3 is on, V functions will not work. • The component connected to HDMI input other than HDMI IN 1/2/3/AUX INPUT is selected as an input source for Zone 2, the linked operations of Q may not work properly. In this case, set the linked operations to Off on the source component. • When setting the AV receiver to standby mode while Zone 2/3 is active, the Z2 or Z3 indicator is dimly lit. • Activating Zones in the main room when the listening mode is set to Pure Audio will automatically switch it to Direct. • "GAME2" cannot be selected as input sources for Zone 3. • When "GAME2" is the input source of Main room and Zone 3 is set to share the same source, no sound will be output from Zone 3. • Even if you repeatedly press the remote controller's ZONE to select zones, the last zone selection will be retained once you have switched to other components by pressing other REMOTE MODE after pressing ZONE. Advanced Operations Using the Remote Controller in Zone and Multiroom Control Kits To control the AV receiver with the remote controller while you're in Zone, you'll need a commercially available multiroom remote control kit for each zone. • Multiroom kits are made by Niles and Xantech. These kits can also be used when there isn't a clear line of sight to the AV receiver's remote sensor, such as when it's installed inside a cabinet. Using a Multiroom Kit with Zone In this setup, the IR receiver in Zone picks up the infrared signals from the remote controller and feeds them through to the AV receiver in the main room via the connecting block. IR IN Connecting block IR receiver Remote controller Main room Zone Signal flow The miniplug cable from the connecting block should be connected to the AV receiver's IR IN jack, as shown below. En-90
-
 1
1 -
2
-
3
-
4
-
5
-
6
-
7
-
8
-
9
-
10
-
11
-
12
-
13
-
14
-
15
-
16
-
17
-
18
-
19
-
20
-
21
-
22
-
23
-
24
-
25
-
26
-
27
-
28
-
29
-
30
-
31
-
32
-
33
-
34
-
35
-
36
-
37
-
38
-
39
-
40
-
41
-
42
-
43
-
44
-
45
-
46
-
47
-
48
-
49
-
50
-
51
-
52
-
53
-
54
-
55
-
56
-
57
-
58
-
59
-
60
-
61
-
62
-
63
-
64
-
65
-
66
-
67
-
68
-
69
-
70
-
71
-
72
-
73
-
74
-
75
-
76
-
77
-
78
-
79
-
80
-
81
-
82
-
83
-
84
-
 85
85 -
 86
86 -
 87
87 -
 88
88 -
 89
89 -
 90
90 -
 91
91 -
 92
92 -
 93
93 -
 94
94 -
 95
95 -
96
-
97
-
98
-
99
-
100
-
101
-
102
-
103
-
104
-
105
-
106
-
107
-
108
-
109
-
110
-
111
-
112
-
113
-
114
-
115
-
116
-
117
-
118
-
119
-
120
-
121
-
122
-
123
-
124
-
125
-
126
-
127
-
128
-
129
-
130
-
131
-
132
-
133
-
134
-
135
-
136
-
137
-
138
-
139
-
140
-
141
-
142
-
143
-
144
-
145
-
146
-
147
-
148
-
149
-
150
-
151
-
152
-
153
-
154
-
155
-
156
-
157
-
158
-
159
-
160
-
161
-
162
-
163
-
164
-
165
-
166
-
167
-
168
 |
 |
