Onkyo TX SR806 Owner Manual - Page 25
Connecting a TV or Projector, Step 1: Video Connection
 |
UPC - 751398008238
View all Onkyo TX SR806 manuals
Add to My Manuals
Save this manual to your list of manuals |
Page 25 highlights
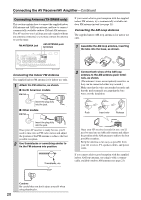
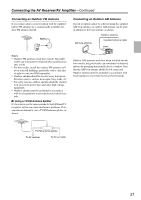
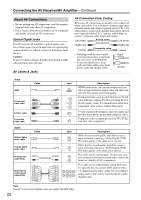
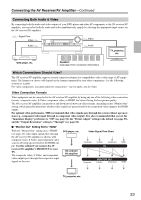
Connecting the AV Receiver/AV Amplifier-Continued Connecting a TV or Projector See "Connecting Components with HDMI" on page 33 for HDMI connection information. Step 1: Video Connection Choose a video connection that matches your TV ( A , B , or C ), and then make the connection. Step 2: Audio Connection Choose an audio connection that matches your TV ( a , b , or c ), and then make the connection. • With connection a , you can listen to and record audio from your TV and listen in Zone 2. • To enjoy Dolby Digital and DTS, use connection b or c . (To record or listen in Zone 2 as well, use a and b , or a and c .) Connection A B C a b c AV receiver/AV amplifier COMPONENT VIDEO MONITOR OUT MONITOR OUT S MONITOR OUT V GAME/TV IN L/R DIGITAL COAXIAL IN 2 (VCR/DVR) DIGITAL OPTICAL IN 1 (GAME/TV) Signal flow TV Component video input S-Video input Composite video input Analog audio L/R output Digital coaxial output Digital optical output b C B c a A COAXIAL OUT OPTICAL OUT Y PB PR COMPONENT VIDEO IN L R AUDIO OUT S VIDEO IN VIDEO IN Connect one or the other Connection b must be assigned (see page 46) TV, projector, etc. Hint! If your TV has no audio outputs, connect an audio output from your VCR or cable or satellite receiver to the AV receiver/AV amplifier and use its tuner to listen to TV programs through the AV receiver/AV amplifier (see pages 28 and 30). 25
-
 1
1 -
2
-
3
-
4
-
5
-
6
-
7
-
8
-
9
-
10
-
11
-
12
-
13
-
14
-
15
-
16
-
17
-
18
-
19
-
 20
20 -
 21
21 -
 22
22 -
 23
23 -
 24
24 -
 25
25 -
 26
26 -
 27
27 -
 28
28 -
 29
29 -
 30
30 -
31
-
32
-
33
-
34
-
35
-
36
-
37
-
38
-
39
-
40
-
41
-
42
-
43
-
44
-
45
-
46
-
47
-
48
-
49
-
50
-
51
-
52
-
53
-
54
-
55
-
56
-
57
-
58
-
59
-
60
-
61
-
62
-
63
-
64
-
65
-
66
-
67
-
68
-
69
-
70
-
71
-
72
-
73
-
74
-
75
-
76
-
77
-
78
-
79
-
80
-
81
-
82
-
83
-
84
-
85
-
86
-
87
-
88
-
89
-
90
-
91
-
92
-
93
-
94
-
95
-
96
-
97
-
98
-
99
-
100
-
101
-
102
-
103
-
104
-
105
-
106
-
107
-
108
-
109
-
110
-
111
-
112
-
113
-
114
-
115
-
116
-
117
-
118
-
119
-
120
-
121
-
122
-
123
-
124
 |
 |
