Onkyo TX SR806 Owner Manual - Page 9
Continued, TUNING MODE or LATE NIGHT button 59 - thx
 |
UPC - 751398008238
View all Onkyo TX SR806 manuals
Add to My Manuals
Save this manual to your list of manuals |
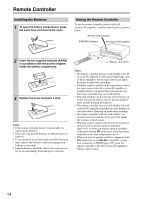
Page 9 highlights
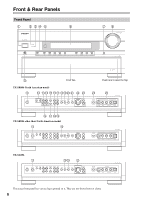
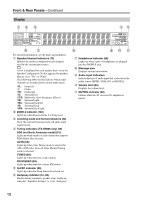
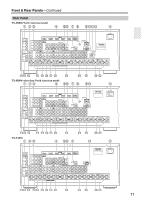
Front & Rear Panels-Continued The page numbers in parentheses show where you can find the main explanation for each item. B ON/STANDBY button (40) Q MOVIE/TV button (64) This button is used to set the AV receiver/AV amplifier to On or Standby. Selects the listening modes intended for use with movies and TV. C STANDBY indicator (40) R MUSIC button (64) This indicator lights up when the AV receiver/AV amplifier is in Standby mode, and it flashes while a signal is being received from the remote controller. D ZONE 2 indicator (102) This indicator lights up when Zone 2 is selected. E Input selector buttons (56) These buttons are used to select from the following input sources: MULTI CH, DVD, VCR/DVR, CBL/SAT, GAME/TV, AUX, TAPE, TUNER, CD, PHONO. The [MULTI CH] button selects the DVD analog multichannel input. F Remote control sensor (14) This sensor receives control signals from the remote controller. G Display See "Display" on page 10. H DISPLAY button (57) This button is used to display various information about the currently selected input source. Selects the listening modes intended for use with music. S DIMMER or RT/PTY/TP button (57, 62) This button is used to adjust the display brightness. On the European model, this is the [RT/PTY/TP] button, and it's for RDS (Radio Data System). See "Using RDS (not North American model)" on page 61. T MEMORY or Re-EQ button (60, 85) This button is used when storing or deleting radio presets. On the TX-SA806, this button is used to turn the Re-EQ function on or off. U TUNING MODE or LATE NIGHT button (59, 85) This button is used to select the Auto or Manual tuning mode. On the TX-SA806, this button is used to turn the Late Night function on or off. V SETUP button This button is used to access the onscreen setup menus that appear on the connected TV. I MASTER VOLUME control (56) and indicator This control is used to adjust the volume of the AV receiver/AV amplifier to -∞ dB, -81.5 dB through +18.0 dB (relative display). The volume level can also be displayed as an absolute value. See "Volume Setup" on page 91. J PURE AUDIO button and indicator (64) Selects the Pure Audio listening mode. The indicator lights up when this mode is selected. Pressing this button again selects the previous listening mode. W Arrow, TUNING, PRESET and ENTER buttons When the AM or FM input source is selected, the TUNING [R]/[X] buttons are used to tune the tuner, and the PRESET [F]/[S] buttons are used to select radio presets (see page 60) (TX-SR806 only). When the onscreen setup menus are used, they work as arrow buttons and are used to select and set items. The [ENTER] button is also used with the onscreen setup menus. X RETURN button K PHONES jack (58) This 1/4-inch phone jack is for connecting a standard pair of stereo headphones for private listening. This button is used to return to the previously displayed onscreen setup menu. Y SETUP MIC jack (51) L POWER switch (40) North American models do not have this switch. This is the main power switch. When set to OFF, the AV receiver/AV amplifier is completely shutdown. It must be set to ON to set the AV receiver/AV amplifier to On or Standby. M ZONE 2 and OFF buttons (102) The [ZONE 2] button is used to select the input source for Zone 2. The [OFF] button is used to turn off the output of Zone 2. N LEVEL button (103) Used when adjusting the volume level of Zone 2. The included speaker setup microphone is connected here for automatic speaker setup. Z AUX INPUT This input can be used to connect a camcorder, game console, and so on. There are jacks for S-Video, composite video, analog audio, and optical digital audio. [ Up [S] and Down [F] buttons (57, 103) Used to adjust the tone, and the volume and balance of Zone 2. cr DIGITAL INPUT button (98) Selects the options for automatic audio input selection setup. O TONE button (57, 103) Used to adjust the tone (bass and treble). P HDMI OUT button (41) Used to set the "Monitor Out" setting. cs GAME button (64) Selects the listening modes intended for use with video games. ct THX button (64) Selects the THX listening modes. 9
-
 1
1 -
2
-
3
-
 4
4 -
 5
5 -
 6
6 -
 7
7 -
 8
8 -
 9
9 -
 10
10 -
 11
11 -
 12
12 -
 13
13 -
 14
14 -
15
-
16
-
17
-
18
-
19
-
20
-
21
-
22
-
23
-
24
-
25
-
26
-
27
-
28
-
29
-
30
-
31
-
32
-
33
-
34
-
35
-
36
-
37
-
38
-
39
-
40
-
41
-
42
-
43
-
44
-
45
-
46
-
47
-
48
-
49
-
50
-
51
-
52
-
53
-
54
-
55
-
56
-
57
-
58
-
59
-
60
-
61
-
62
-
63
-
64
-
65
-
66
-
67
-
68
-
69
-
70
-
71
-
72
-
73
-
74
-
75
-
76
-
77
-
78
-
79
-
80
-
81
-
82
-
83
-
84
-
85
-
86
-
87
-
88
-
89
-
90
-
91
-
92
-
93
-
94
-
95
-
96
-
97
-
98
-
99
-
100
-
101
-
102
-
103
-
104
-
105
-
106
-
107
-
108
-
109
-
110
-
111
-
112
-
113
-
114
-
115
-
116
-
117
-
118
-
119
-
120
-
121
-
122
-
123
-
124
 |
 |