Optoma BE Free6 BEFree6 UserManual - Page 5
The Basics
 |
View all Optoma BE Free6 manuals
Add to My Manuals
Save this manual to your list of manuals |
Page 5 highlights
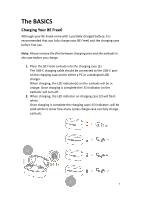
The BASICS Charging Your BE Free6 Although your BE Free6 come with a partially charged battery, it is recommended that you fully charge your BE Free6 and the charging case before first use. Note: Please remove the film between charging pins and the earbuds in the case before you charge. 1. Place the BE Free6 earbuds into the charging case (1). The USB-C charging cable should be connected to the USB-C port on the charging case and to either a PC or a dedicated USB charger. When charging, the LED indicator(s) on the earbuds will be in orange. Once charging is complete the LED Indicator on the earbuds' will turn off. 2. When charging, the LED indicator on charging case (2) will flash white. Once charging is complete the charging case LED indicators will be solid white to show how many cycles charge case can fully charge earbuds. 1 1 2 5
-
 1
1 -
 2
2 -
 3
3 -
 4
4 -
 5
5 -
 6
6 -
 7
7 -
 8
8 -
 9
9 -
 10
10 -
 11
11 -
12
-
13
-
14
-
15
-
16
-
17
-
18
-
19
 |
 |
