Optoma ZK750 ZK1050_UM - Page 29
Display menu, Image Settings
 |
View all Optoma ZK750 manuals
Add to My Manuals
Save this manual to your list of manuals |
Page 29 highlights
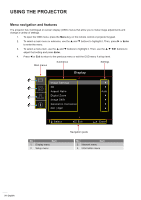
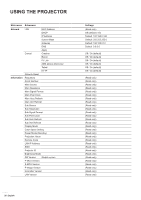
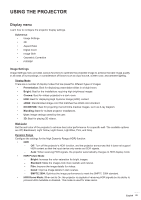
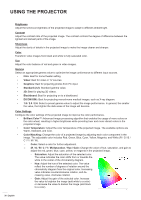
USING THE PROJECTOR Display menu Learn how to configure the projector display settings. Submenus ‡‡ Image Settings ‡‡ 3D ‡‡ Aspect Ratio ‡‡ Digital Zoom ‡‡ Image Shift ‡‡ Geometric Correction ‡‡ PIP/PBP Image Settings Image Settings menu provides various functions to optimize the projected image to achieve the best image quality in all kinds of surroundings, in consideration of factors such as input source, screen color, and ambient lighting. Display Mode There are a number of display modes that are preset for different types of images. ‡‡ Presentation: Best for displaying presentation slides in a bright room. ‡‡ Bright: Best for the installations requiring high brightness images. ‡‡ Cinema: Best for videos projected in a dark room. ‡‡ HDR: Best for displaying High Dynamic Range (HDR) content. ‡‡ sRGB: Standardized image color that matches the sRGB color standard. ‡‡ DICOM SIM.: Best for projecting monochrome medical images, such as X-ray diagram. ‡‡ Blending: Best for multiple projector installations. ‡‡ User: Image settings saved by the user. ‡‡ 3D: Best for playing 3D videos. Wall Color Set the wall color of the projector to achieve best color performance for a specific wall. The available options are Off, Blackboard, Light Yellow, Light Green, Light Blue, Pink, and Gray. Dynamic Range Configure the settings for the High Dynamic Range (HDR) function. ‡‡ HDR ±± Off: Turn off the projector's HDR function, and the projector announces that it does not support HDR content so that the input device only sends out SDR signals. ±± Auto: When receiving HDR signals, the projector automatically changes to HDR display mode. ‡‡ HDR Picture Mode ±± Bright: Increase the color saturation for bright images. ±± Standard: Make the images look more realistic and natural. ±± Film: Improve the image details for videos. ±± Detail: Improve image details in dark scenes. ±± SMPTE 2084: Optimize the image performance to meet the SMPTE 2084 standard. ‡‡ HDR Demo Mode: When set to On, the projector is capable of receiving HDR signals but its ability to process HDR metadata is disabled. This mode is used for sales demo. English 29
-
 1
1 -
2
-
3
-
4
-
5
-
6
-
7
-
8
-
9
-
10
-
11
-
12
-
13
-
14
-
15
-
16
-
17
-
18
-
19
-
20
-
21
-
22
-
23
-
 24
24 -
 25
25 -
 26
26 -
 27
27 -
 28
28 -
 29
29 -
 30
30 -
 31
31 -
 32
32 -
 33
33 -
 34
34 -
35
-
36
-
37
-
38
-
39
-
40
-
41
-
42
-
43
-
44
-
45
-
46
-
47
-
48
-
49
-
50
-
51
-
52
-
53
-
54
-
55
-
56
-
57
-
58
 |
 |
