Optoma ZK750 ZK1050_UM - Page 31
Red / Green / Blue Bias, W Red / Green / Blue
 |
View all Optoma ZK750 manuals
Add to My Manuals
Save this manual to your list of manuals |
Page 31 highlights
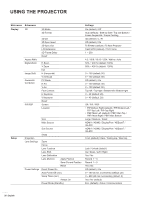
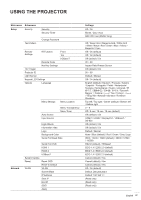
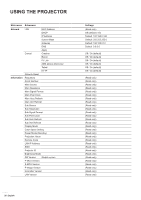
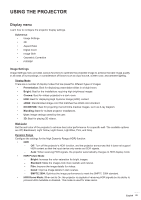
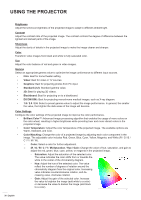
USING THE PROJECTOR ±± (W) Red / Green / Blue: Change the value of red, green, and blue to adjust the white color. ±± Reset: Reset the selected color to factory default settings. ±± Exit: Exit the submenu. ‡‡ RGB Gains/Bias: Gain and bias are individual controls for each RGB channels used to set greyscale. The Gains calibrate the color of the dark parts and Bias calibrate the white parts. ±± Red / Green / Blue Gain: Adjust the color of the image's bright areas. ±± Red / Green / Blue Bias: Adjust the color of the image's dark areas. ±± Reset: Reset the settings to factory default values. ±± Exit: Exit the submenu. ‡‡ Color Space: Select a color space that has been specifically tuned for the input signal. The available options are Auto, RGB, YUV, RGB (0-255), and RGB (16-235). Select RGB only for HDMI input. UltraDetail Adjust the edges of the projected image to display sharper images with more details. Extreme Black Automatically increase the contrast ratio by turning off the laser light when black image is detected. Dynamic Black Automatically adjust the contrast ratio for video sources. It improves the black level in dark scenes by reducing the light output. Brightness Mode Set up the brightness mode depending on the various installation requirements. ‡‡ Constant Power: Enable this mode to set the image brightness to a specific level controlled by the laser diode power level. Use Power Level from the upper menu to set the laser diode power level. ‡‡ Constant Luminance: Maintain the image brightness that is set in Constant Power. A special algorithm is designed to compensate the natural decay of brightness so that the image can be maintained at a fixed brightness level. ‡‡ Eco Mode: Set the image brightness to 50% of the projector's maximum brightness level, which lowers the power consumption and extends the lifetime of the projector. The projector reaches its maximum brightness level when the display mode is set to Bright. Power Level Set the power level of the laser diode power to adjust the image brightness. The power value ranges from 1 to 100, which covers the power level from 30% to 100%. The set power value is activated when Constant Power in Brightness Mode is enabled. PureEngine Provide various functions to optimize the image performance for more true to life colors in movie scenes, and more natural motion flow in action videos. � PureContrast: Optimize the brightness in dark and light movie scenes to improve the image details. ‡‡ PureColor: Optimize the image colors to make the colors appear richer and more vibrant in videos. ‡‡ PureMotion: Eliminate motion blurring or image judder in high-speed action videos, using sophisticated frame-interpolation technology and advanced motion control processing. ‡‡ PureMotion Demo: Demonstrate the difference in the image quality between the images processed by PureMotion and the original images. Reset Reset all color settings to factory default values. English 31
-
 1
1 -
2
-
3
-
4
-
5
-
6
-
7
-
8
-
9
-
10
-
11
-
12
-
13
-
14
-
15
-
16
-
17
-
18
-
19
-
20
-
21
-
22
-
23
-
24
-
25
-
 26
26 -
 27
27 -
 28
28 -
 29
29 -
 30
30 -
 31
31 -
 32
32 -
 33
33 -
 34
34 -
 35
35 -
 36
36 -
37
-
38
-
39
-
40
-
41
-
42
-
43
-
44
-
45
-
46
-
47
-
48
-
49
-
50
-
51
-
52
-
53
-
54
-
55
-
56
-
57
-
58
 |
 |
