Palm M515 Handbook - Page 263
Programming the mapping table, To program a new custom mapping table:
 |
UPC - 805931004703
View all Palm M515 manuals
Add to My Manuals
Save this manual to your list of manuals |
Page 263 highlights
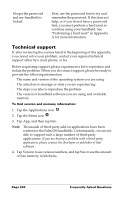
Column Headings option in the Sheet settings of the Page Setup command. This enables you to quickly determine the size of the Section(s), as well as the numbers for the start rows and columns. s On the printed copy, identify the data Sections. A Section is an area of data with common row and column formatting. A yellow highlighter marking pen can make it easy to see the Sections as you work with programming the mapping table. Your custom Expense Report can contain any number of Sections, and the same data can be repeated in any Section. s On the printed copy, identify the type of Labels that apply to each Section. Each Section can have only one kind of Fixed or Variable Label for rows. Likewise, each Section can have only one kind of Fixed or Variable Label for columns. s Place a copy of your custom Expense Report in the Template folder (in the Palm Desktop software directory). Change the file name so it has the file extension .xlt (which defines it as a Microsoft Excel template). Make a note of the exact file name so it can be defined in the mapping table file. Programming the mapping table Once you have analyzed the components of your custom Expense Report, you can program the mapping table to fill the report with data from the handheld. To program a new custom mapping table: 1. Open a copy of the Maptable.xls file in Microsoft Excel. Note: This file is located in the same folder as the Palm Desktop software application. Make a backup copy of this file before you make your modifications. 2. Mapping a new template. Scroll to where you find the name of the original template that you chose for your modifications. The name of the template will appear in column B of the Maptable.xls file, next to the cell highlighted in green that reads "Template Name:". If you did not modify an existing template, move to any table in the Maptable.xls file. 3. Select all the rows associated with the template name. To select the rows, click and drag on the row numbers (left side), so they appear highlighted. Appendix C Page 253
-
 1
1 -
2
-
3
-
4
-
5
-
6
-
7
-
8
-
9
-
10
-
11
-
12
-
13
-
14
-
15
-
16
-
17
-
18
-
19
-
20
-
21
-
22
-
23
-
24
-
25
-
26
-
27
-
28
-
29
-
30
-
31
-
32
-
33
-
34
-
35
-
36
-
37
-
38
-
39
-
40
-
41
-
42
-
43
-
44
-
45
-
46
-
47
-
48
-
49
-
50
-
51
-
52
-
53
-
54
-
55
-
56
-
57
-
58
-
59
-
60
-
61
-
62
-
63
-
64
-
65
-
66
-
67
-
68
-
69
-
70
-
71
-
72
-
73
-
74
-
75
-
76
-
77
-
78
-
79
-
80
-
81
-
82
-
83
-
84
-
85
-
86
-
87
-
88
-
89
-
90
-
91
-
92
-
93
-
94
-
95
-
96
-
97
-
98
-
99
-
100
-
101
-
102
-
103
-
104
-
105
-
106
-
107
-
108
-
109
-
110
-
111
-
112
-
113
-
114
-
115
-
116
-
117
-
118
-
119
-
120
-
121
-
122
-
123
-
124
-
125
-
126
-
127
-
128
-
129
-
130
-
131
-
132
-
133
-
134
-
135
-
136
-
137
-
138
-
139
-
140
-
141
-
142
-
143
-
144
-
145
-
146
-
147
-
148
-
149
-
150
-
151
-
152
-
153
-
154
-
155
-
156
-
157
-
158
-
159
-
160
-
161
-
162
-
163
-
164
-
165
-
166
-
167
-
168
-
169
-
170
-
171
-
172
-
173
-
174
-
175
-
176
-
177
-
178
-
179
-
180
-
181
-
182
-
183
-
184
-
185
-
186
-
187
-
188
-
189
-
190
-
191
-
192
-
193
-
194
-
195
-
196
-
197
-
198
-
199
-
200
-
201
-
202
-
203
-
204
-
205
-
206
-
207
-
208
-
209
-
210
-
211
-
212
-
213
-
214
-
215
-
216
-
217
-
218
-
219
-
220
-
221
-
222
-
223
-
224
-
225
-
226
-
227
-
228
-
229
-
230
-
231
-
232
-
233
-
234
-
235
-
236
-
237
-
238
-
239
-
240
-
241
-
242
-
243
-
244
-
245
-
246
-
247
-
248
-
249
-
250
-
251
-
252
-
253
-
254
-
255
-
256
-
257
-
 258
258 -
 259
259 -
 260
260 -
 261
261 -
 262
262 -
 263
263 -
 264
264 -
 265
265 -
 266
266 -
 267
267 -
 268
268 -
269
-
270
-
271
-
272
-
273
-
274
-
275
-
276
-
277
-
278
-
279
-
280
-
281
-
282
-
283
-
284
-
285
-
286
 |
 |
