Panasonic AG DVC20 3 Ccd Dv Camcorder - Page 10
Using the viewfinder, Power supply, CAUTION - battery
 |
UPC - 791871302958
View all Panasonic AG DVC20 manuals
Add to My Manuals
Save this manual to your list of manuals |
Page 10 highlights
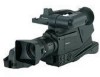
Before using Using the viewfinder Power supply ª Using the viewfinder 1 Pull out the viewfinder and turn it upward/downward by pinching the viewfinder extension knob. ª Charging the battery When this product is purchased, the battery is not charged. Charge the battery before using this product. ≥Battery charging time (-11-) ≥We recommend using Panasonic batteries. ≥If you use other batteries, we cannot guarantee the quality of this product. ≥If the DC input lead is connected to the AC adapter, then the battery will not get charged. Remove the DC input lead from the AC adapter. 1 Connect the AC mains lead to the AC adapter and the AC mains socket. 2 Put the battery on the battery mount by aligning the mark, and then securely plug it in. ª Adjusting the field of view 1 Adjust the focus by sliding the eyepiece corrector knob. 1122::3300::4455PPMM OOCCTT 1155 22000055 12:30:45PM OCT 15 2005 ≥You can adjust the brightness of the viewfinder from the menu. The range of view shown in the LCD or viewfinder is slightly narrower than that outputted from the video output socket. ª Charging lamp Lights up: Charging Goes off: Charging completed Flashing: The battery is over discharged (discharged excessively). In a while, the lamp will light up and normal charging will start. When the battery temperature is excessively high or low, the [CHARGE] lamp flashes and the charging time will be longer than normal. ª Connecting to the AC outlet DC IN 7.9V 1 Connect the AC mains lead to the AC adapter and the AC mains socket. 2 Connect the DC Input Lead to the [DC IN] Socket on the camera-recorder. 3 Connect the DC input lead to the AC adapter. ≥Do not use the power cord for other equipment since the power cord is exclusively designed for the camerarecorder. Or do not use the power cord of other equipment for the camera-recorder. CAUTION: This unit will operate on 110/120/220/240V AC. An AC plug adapter may be required for voltages other than 120V AC. If a conversion plug is required, consult with your dealer as to which one is to be purchased. 10
-
 1
1 -
2
-
3
-
4
-
 5
5 -
 6
6 -
 7
7 -
 8
8 -
 9
9 -
 10
10 -
 11
11 -
 12
12 -
 13
13 -
 14
14 -
 15
15 -
16
-
17
-
18
-
19
-
20
-
21
-
22
-
23
-
24
-
25
-
26
-
27
-
28
-
29
-
30
-
31
-
32
-
33
-
34
-
35
-
36
-
37
-
38
-
39
-
40
-
41
-
42
 |
 |
