Panasonic AG DVC20 3 Ccd Dv Camcorder - Page 8
Audio output sockets [AUDIO OUT], Off/On switch [OFF/ON] - microphone
 |
UPC - 791871302958
View all Panasonic AG DVC20 manuals
Add to My Manuals
Save this manual to your list of manuals |
Page 8 highlights
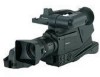
(13) (14) (15) (16) (17) Before using (18) (19) (28) (29) (25) (26) (27) (13) Eyecup -38(14) Viewfinder -10-, -38- Due to limitations in LCD production technology, there may be some tiny bright or dark spots on the Viewfinder screen. However, this is not a malfunction and does not affect the recorded picture. (15) LCD monitor -9-, -38- Due to limitations in LCD production technology, there may be some tiny bright or dark spots on the LCD monitor screen. However, this is not a malfunction and does not affect the recorded picture. (16) LCD monitor open button [PUSH OPEN] -9(17) Reset button -33-, -36(18) Eyepiece corrector knob -10(19) Speaker -26- (30) (31) (32) (33) (25) Shoulder strap holders -9(26) Sub zoom lever [W/T] -20-, -26(27) Sub recording start/stop button -19(28) Battery eject button [PUSH] -11(29) Battery holder -11(30) Headphone socket [PHONES] (31) Cassette holder -12(32) Cassette compartment cover -12(33) Cassette eject lever [OPEN/EJECT] -12- (34) DC IN 7.9V (39) OFF ON (40)(41) (20) DV S-VIDEO OUT VIDEO OUT L- AUDIO OUT -R (42) (21) (22) (23)(24) (20) Smart accessory shoes ≥The External Stereo Microphone (optional), etc. can be attached here. (21) Microphone (built-in, stereo) -20(22) External microphone socket [EXT MIC] ≥Connect with an external microphone or audio equipment. (When this socket is in use, the built-in microphone does not operate.) (23) Zoom lever [W/T] -20-, -26(24) Grip belt -9- (35) (36) (37) (38) (34) DC Input socket [DC IN] -10(35) DV terminal [DV] -29- ≥Connect this to the digital video equipment. (36) S-Video output socket [S-VIDEO OUT] -27-, -28(37) Video output socket [VIDEO OUT] -27-, -28(38) Audio output sockets [AUDIO OUT] -27-, -28(39) Power lamp -13(40) Recording start/stop button -19(41) Off/On switch [OFF/ON] -13(42) Tripod receptacle This is a hole for attaching the camera to optional tripod. (Please carefully read the operating instructions for how to attach the tripod to the camera.) 8
-
 1
1 -
2
-
 3
3 -
 4
4 -
 5
5 -
 6
6 -
 7
7 -
 8
8 -
 9
9 -
 10
10 -
 11
11 -
 12
12 -
 13
13 -
14
-
15
-
16
-
17
-
18
-
19
-
20
-
21
-
22
-
23
-
24
-
25
-
26
-
27
-
28
-
29
-
30
-
31
-
32
-
33
-
34
-
35
-
36
-
37
-
38
-
39
-
40
-
41
-
42
 |
 |
