Panasonic AKHRP200 AKHRP200 User Guide - Page 11
Set buzzer (beep/call tone), 9 Display brightness setting (LED/7-segment display)
 |
View all Panasonic AKHRP200 manuals
Add to My Manuals
Save this manual to your list of manuals |
Page 11 highlights
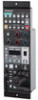
Setup Mode Operations (continued) 7-2 Set pedestal Press or to select [PE] and press to confirm the selection. ND CC SHT SYNC M.GAIN M.PED IRIS • To exit setup mode, hold down for about 2 seconds. • To make other settings, press to select a menu number. 8. Set buzzer (beep/call tone) 1. Press to select menu number [8]. Select on/off UP DATA SET ND CC M.GAIN SHT SYNC M.PED IRIS DOWN SET UP DISPLAY SELECT ND/CC M.GAIN/M.PED SHUTTER SHIFT + UP+DOWN SAVE/LOAD EXIT EXECUTE CAMERA 10-19 No. SELECT Press to confirm Press to exit setup mode (hold down) Press to select the menu number 2. Press or to select [on] and press to confirm the selection. ND CC SHT SYNC M.GAIN M.PED IRIS • To exit setup mode, hold down for about 2 seconds. • To make other settings, press to select a menu number. 9 Display brightness setting (LED/7-segment display) Press to select menu number [9]. LED display brightness Adjust brightness 7-segment display brightness UP DATA SET ND CC M.GAIN SHT SYNC M.PED IRIS DOWN SET UP DISPLAY SELECT ND/CC M.GAIN/M.PED SHUTTER SHIFT + UP+DOWN SAVE/LOAD EXIT EXECUTE CAMERA 10-19 No. SELECT LED/7-segment display switch Press to confirm Press to exit setup mode (hold down) Press to select the menu number 9-1 Set LED brightness 1. Press to select [ND] and press to confirm the selection. • Each press of toggles between [ND] (LED display brightness) and [CC] (7-segment display brightness). ND CC SHT SYNC M.GAIN M.PED IRIS 2. Press or to select LED display brightness and press to confirm the selection. ND CC SHT SYNC M.GAIN M.PED IRIS • To exit setup mode, hold down for about 2 seconds. • To make other settings, press to select a menu number. 9-2 Set 7-segment display brightness 1. Press to select [CC] and press to confirm the selection. • Each press of toggles between [ND] (LED display brightness) and [CC] (7-segment display brightness). ND CC SHT SYNC M.GAIN M.PED IRIS 2. Press or to select 7-segment display brightness and press to confirm the selection. ND CC SHT SYNC M.GAIN M.PED IRIS • To exit setup mode, hold down for about 2 seconds. • To make other settings, press to select a menu number. Menu numbers 10 to 15 are for future use. 16 Initialize settings When settings are initialized, the unit is automatically restarted.For details on what settings are initialized, refer to page 6 1. Press to select menu number [16]. Select y (Initialize)/n (Cancel) UP DATA SET ND CC M.GAIN SHT SYNC M.PED IRIS DOWN SET UP DISPLAY SELECT ND/CC M.GAIN/M.PED SHUTTER SHIFT + UP+DOWN SAVE/LOAD EXIT EXECUTE CAMERA 10-19 No. SELECT Press to confirm Press to exit setup mode (hold down) Press to select the menu number 11
-
 1
1 -
2
-
3
-
4
-
5
-
 6
6 -
 7
7 -
 8
8 -
 9
9 -
 10
10 -
 11
11 -
 12
12 -
 13
13 -
 14
14 -
 15
15 -
 16
16 -
17
-
18
-
19
-
20
-
21
-
22
-
23
-
24
-
25
-
26
 |
 |
