Panasonic AV-HS410 Operating Instructions Basic - Page 32
Setting the system format, 2-2-5. Setting the date and time, Setting the 16:9 squeeze mode
 |
View all Panasonic AV-HS410 manuals
Add to My Manuals
Save this manual to your list of manuals |
Page 32 highlights
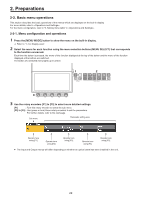
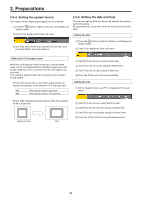
2. Preparations 2-2-4. Setting the system format One system format (input/output signal) can be selected. 1 Press the s button to light its indicator, and display the System menu. 2 Use [F1] to display the Format sub menu. 2-2-5. Setting the date and time The user can set the date and time to be used as the memory card's time stamp. Be absolutely sure to set them when an memory card is to be used. Setting the date 3 Use [F2], select the format using the Format item, and press the [F2] to enter the selection. 1 Press the s button to light its indicator, and display the System menu. 2 Use [F1] to display the Date sub menu. Setting the 16:9 squeeze mode When the 16:9 squeeze mode is selected, a border width (wipe or PinP) is established that considers cases where SD format images are to be converted into the 16:9 aspect ratio and used. This setting is possible when SD is selected as the system format setting. On the Format sub menu, use [F4] to select whether to support the squeeze mode using the 16:9 Squeeze item. On The squeeze mode is supported. Off The squeeze mode is not supported. Border width (graphical representation) when the squeeze mode is supported Squeeze (4:3) 16:9 3 Use [F2] to set the year using the Year item. 4 Use [F3] to set the month using the Month item. 5 Use [F4] to set the day using the Date item. 6 Press the [F5] to enter the year/month/day. Setting the time 1 On the System menu, use [F1] to display the Time sub menu. 2 Use [F2] to set the hour using the Hour item. 3 Use [F3] to set the minutes using the Minute item. 4 Use [F4] to set the seconds using the Second item. 5 Press the [F5] to enter the hour/minutes/seconds. 32
-
 1
1 -
2
-
3
-
4
-
5
-
6
-
7
-
8
-
9
-
10
-
11
-
12
-
13
-
14
-
15
-
16
-
17
-
18
-
19
-
20
-
21
-
22
-
23
-
24
-
25
-
26
-
 27
27 -
 28
28 -
 29
29 -
 30
30 -
 31
31 -
 32
32 -
 33
33 -
 34
34 -
 35
35 -
 36
36 -
 37
37 -
38
-
39
-
40
 |
 |
