Panasonic BL-C111A Service Manual - Page 22
Setup Guide
 |
UPC - 037988845149
View all Panasonic BL-C111A manuals
Add to My Manuals
Save this manual to your list of manuals |
Page 22 highlights
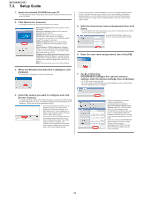
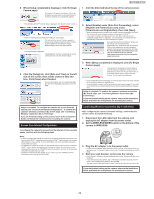
BL-C111A /BL-C131A 7.3. Setup Guide 1. Insert the included CD-ROM into your PC. • The Setup Program starts. If the program does not start, double-click Setup.exe found on the CD-ROM. 2. Click [Search for Cameras]. • The program searches for cameras connected to your network. • [About this program]: Displays the program's version information. • [Search for Cameras]: Displays a list of cameras connected to your network. • [Manual]: Allows you to view the included documentation. PDF versions of the printed documentation are included on the CD-ROM; Adobe® Reader® is required to view them. • [Update Firmware]: Allows you to use the Setup Program to update the camera's firmware (built-in software). • [Save Settings to PC/Save Settings to Camera]: Allows you to save a backup of all camera settings on your PC, or restore all settings in the camera using a backup file saved on your PC. • [Network Camera Recorder Single Camera Version Installation]: Installs the [Network Camera Recorder Single Camera Version] software. (See "Installing the Network Camera Recorder Single Camera Version" on page 2.) • [Exit]: Closes the screen and exits the Setup Program. • If you are using firewall or antivirus software on your PC, the Setup Program may not be able to find any cameras on your network. If you cannot disable your firewall or antivirus software, you can configure the camera by entering its MAC address (see "Camera Diagrams" on page 2 in the Installation Guide to find your camera's MAC address label). 5. Enter the desired user name and password, then click [Save]. • Do not forget the user name and password you set here, otherwise you will need to reset the camera and configure it again. An authentication dialog prompts you to enter the user name and password again. 6. Enter the user name and password, then click [OK]. 3. When the Windows Security Alert is displayed, click [Unblock]. • If the dialog is not displayed, continue to the next step. 7. For BL-C131A Only: Click [Next] to configure the camera's wireless settings, enter the wireless settings, then click [Save]. • BL-C111A users can skip this step. • BL-C131A users can skip this step by selecting [Disable] and then clicking [Next]. Wireless settings will not be configured. 4. Select the camera you want to configure, and click [Access Camera]. • To assign all network settings to the camera manually, or to assign an IP address using the DHCP feature of your router, click [Network Settings], then select [Specify an IP Address] or [DHCP] and enter the appropriate settings. • If you have more than one camera, you can distinguish cameras by model number, printed on the front of the camera, or by MAC address (see "Camera Diagrams" on page 2 in the Installation Guide to find your camera's MAC address label). • If more than 20 minutes have passed since the selected camera was turned on, you cannot configure the camera. Turn off the camera, then turn it on again. This restriction does not apply to cameras which have not been configured yet or have been reset to their factory default settings. • Configure the camera for wireless access by configuring the corresponding camera settings to match the wireless settings of your wireless router. For more information, refer to the operating instructions included with your wireless router, and to 5.2.1 Configuring the Camera for Wireless Connection (BL-C131A Only) in the Operating Instructions on the CDROM. • If you have a Panasonic BB-HGW700A Network Camera Control Unit, WEP settings will be configured automatically. WPA-PSK (TKIP) and WPA2-PSK (AES) settings must be entered manually. 22
-
 1
1 -
2
-
3
-
4
-
5
-
6
-
7
-
8
-
9
-
10
-
11
-
12
-
13
-
14
-
15
-
16
-
 17
17 -
 18
18 -
 19
19 -
 20
20 -
 21
21 -
 22
22 -
 23
23 -
 24
24 -
 25
25 -
 26
26 -
 27
27 -
28
-
29
-
30
-
31
-
32
-
33
-
34
-
35
-
36
-
37
-
38
-
39
-
40
-
41
-
42
-
43
-
44
-
45
-
46
-
47
-
48
-
49
-
50
-
51
-
52
-
53
-
54
-
55
-
56
-
57
-
58
-
59
-
60
-
61
-
62
-
63
-
64
-
65
-
66
-
67
-
68
-
69
-
70
-
71
-
72
-
73
-
74
-
75
-
76
-
77
-
78
-
79
-
80
-
81
-
82
-
83
 |
 |