Panasonic BL C131A Operating Instructions - Page 144
Updating a camera's firmware, Saving settings in a configuration file - setup exe
 |
UPC - 037988845156
View all Panasonic BL C131A manuals
Add to My Manuals
Save this manual to your list of manuals |
Page 144 highlights
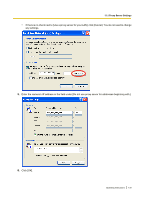
d. Enter the IP address of the DNS server(s). e. Specify the maximum bandwidth the camera is allowed to use. - [DHCP]: Allows the camera to be configured automatically by your network's DHCP server (usually your router). Refer to your ISP or network administrator for more information. a. Enter the host name if required by your ISP or network administrator. b. Enter the default gateway if required by your ISP or network administrator. c. Enter the IP address of the DNS server(s). Refer to your ISP or network administrator for more information. d. Specify the maximum bandwidth the camera is allowed to use. 6. Click [Save]. 7. Follow the on-screen prompts. Updating a camera's firmware 1. Download the latest firmware from the Panasonic Network Camera website (http://panasonic.co.jp/pcc/ products/en/netwkcam/) and save it on your PC. 2. Insert the included CD-ROM into the CD-ROM drive of your PC. • The Setup Program starts. If the program does not start, double-click Setup.exe found on the CD-ROM. 3. Click [Update Firmware]. A dialog prompts you to specify the location of the firmware file. 4. Select the firmware file you downloaded from the Panasonic Network Camera website and click [Open]. 5. Select the camera you would like to update, then click [Execute]. • Only cameras which are compatible with the selected firmware file are displayed. • You can select multiple cameras if desired. 6. Enter the administrator user name and password when prompted, then click [OK]. 7. Click [xxCONFIRM STRING Execute]. • [xxCONFIRM STRING] is displayed when the firmware has been updated. 8. Click [xxCONFIRM STRING Save Log] to display a log of the firmware revision. Saving settings in a configuration file 1. Insert the included CD-ROM into the CD-ROM drive of your PC. • The Setup Program starts. If the program does not start, double-click Setup.exe found on the CD-ROM. 2. Click [Save Settings to PC/Save Settings to Camera]. 3. Select the desired camera, then click [Save Settings to PC]. 4. Enter the camera's administrator user name and password when prompted, then click [OK]. A dialog prompts you to specify a location to save the file. 5. Specify a location to save the file, then click [Save]. 6. When [Settings were saved on the PC.] is displayed, click [OK]. Note • • • Buffered images are not saved in the configuration file. The configuration file's extension (.dat) must not be changed. If you change it, the saved settings cannot be restored. If you save a configuration file and then update the camera's firmware later, the configuration file may not be able to be restored properly. If you regularly save a configuration file of the cameras settings, remember to save a configuration file after you update the camera's firmware. Restoring settings from a configuration file 1. Insert the included CD-ROM into the CD-ROM drive of your PC. • The Setup Program starts. If the program does not start, double-click Setup.exe found on the CD-ROM. 144 Operating Instructions
-
 1
1 -
2
-
3
-
4
-
5
-
6
-
7
-
8
-
9
-
10
-
11
-
12
-
13
-
14
-
15
-
16
-
17
-
18
-
19
-
20
-
21
-
22
-
23
-
24
-
25
-
26
-
27
-
28
-
29
-
30
-
31
-
32
-
33
-
34
-
35
-
36
-
37
-
38
-
39
-
40
-
41
-
42
-
43
-
44
-
45
-
46
-
47
-
48
-
49
-
50
-
51
-
52
-
53
-
54
-
55
-
56
-
57
-
58
-
59
-
60
-
61
-
62
-
63
-
64
-
65
-
66
-
67
-
68
-
69
-
70
-
71
-
72
-
73
-
74
-
75
-
76
-
77
-
78
-
79
-
80
-
81
-
82
-
83
-
84
-
85
-
86
-
87
-
88
-
89
-
90
-
91
-
92
-
93
-
94
-
95
-
96
-
97
-
98
-
99
-
100
-
101
-
102
-
103
-
104
-
105
-
106
-
107
-
108
-
109
-
110
-
111
-
112
-
113
-
114
-
115
-
116
-
117
-
118
-
119
-
120
-
121
-
122
-
123
-
124
-
125
-
126
-
127
-
128
-
129
-
130
-
131
-
132
-
133
-
134
-
135
-
136
-
137
-
138
-
 139
139 -
 140
140 -
 141
141 -
 142
142 -
 143
143 -
 144
144 -
 145
145 -
 146
146 -
 147
147 -
 148
148 -
 149
149 -
150
-
151
-
152
-
153
-
154
 |
 |