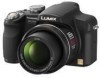
Panasonic DMC-FZ18K Digital Still Camera - Page 12
Quick Guide - details
 |
UPC - 037988986941
View all Panasonic DMC-FZ18K manuals
Add to My Manuals
Save this manual to your list of manuals |
Page 12 highlights
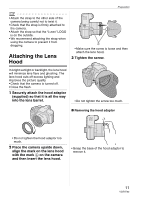
Preparation • You cannot attach the lens hood the opposite way. • When taking pictures with flash with the lens hood attached, the lower portion of the photo may turn dark (vignetting effect) and the control of the flash may be disabled because the photo flash may be obscured by the lens hood. We recommend detaching the lens hood. • When using the AF assist lamp in the dark, detach the lens hood. • For details on how to attach the MC protector and the ND filter, refer to P118. • You cannot attach the tele conversion lens and the close-up lens when the hood adaptor is attached. • For information about [CONVERSION], refer to P86. • If any accessories are lost, customers in the USA should contact Panasonic's parts department at 1 800 833-9626 and customers in Canada should contact 1 800 99-LUMIX (1-800-995-8649) for further information about obtaining replacement parts. CUSTOM 2 Insert the battery and the card. (P15) • When you do not use the card, you can record or play back pictures on the built-in memory. (P16) Refer to P16 when you use a card. 3 Turn the camera on to take pictures. • Set the clock. (P17) OFF ON Quick Guide This is an overview of how to record and play back pictures with the camera. For each step, be sure to refer to the pages indicated in brackets. 1 Charge the battery. (P13) 1 Set the mode dial to [ ]. 2 Press the shutter button to take pictures. (P25) 4 Play back the pictures. CUSTOM • The battery is not charged when the camera is shipped. Charge the battery before use. 1 Set the mode dial to [ ]. 2 Select the picture you want to view. (P33) 12 VQT1F83
-
 1
1 -
2
-
3
-
4
-
5
-
6
-
 7
7 -
 8
8 -
 9
9 -
 10
10 -
 11
11 -
 12
12 -
 13
13 -
 14
14 -
 15
15 -
 16
16 -
 17
17 -
18
-
19
-
20
-
21
-
22
-
23
-
24
-
25
-
26
-
27
-
28
-
29
-
30
-
31
-
32
-
33
-
34
-
35
-
36
-
37
-
38
-
39
-
40
-
41
-
42
-
43
-
44
-
45
-
46
-
47
-
48
-
49
-
50
-
51
-
52
-
53
-
54
-
55
-
56
-
57
-
58
-
59
-
60
-
61
-
62
-
63
-
64
-
65
-
66
-
67
-
68
-
69
-
70
-
71
-
72
-
73
-
74
-
75
-
76
-
77
-
78
-
79
-
80
-
81
-
82
-
83
-
84
-
85
-
86
-
87
-
88
-
89
-
90
-
91
-
92
-
93
-
94
-
95
-
96
-
97
-
98
-
99
-
100
-
101
-
102
-
103
-
104
-
105
-
106
-
107
-
108
-
109
-
110
-
111
-
112
-
113
-
114
-
115
-
116
-
117
-
118
-
119
-
120
-
121
-
122
-
123
-
124
-
125
-
126
-
127
-
128
-
129
-
130
-
131
-
132
-
133
-
134
-
135
-
136
-
137
-
138
-
139
-
140
-
141
-
142
-
143
-
144
-
145
-
146
-
147
-
148
 |
 |
