Panasonic DMC-FZ18K Digital Still Camera - Page 86
Remove the lens cap, lens hood, and hood adaptor., Attach the lens adaptor, DMW-LA3; optional.
 |
UPC - 037988986941
View all Panasonic DMC-FZ18K manuals
Add to My Manuals
Save this manual to your list of manuals |
Page 86 highlights
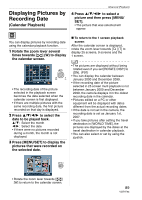
Advanced (Recording pictures) • The file number appears after creating a flip animation. • Press [MENU/SET] three times to close the menu after creating the flip animation. ∫ Deleting all still images used to create flip animation When selecting [DELETE STILL PICTURES] in [FLIP ANIM.] menu, a confirmation screen appears. Select [YES] with 3 and then press [MENU/SET]. 1 Remove the lens cap, lens hood and hood adaptor. 2 Attach the lens adaptor (DMW-LA3; optional). • You cannot use the direction detection function, burst mode, auto bracket and [AUDIO REC.]. • The images in each frame do not appear in normal review. • If you execute [CREATE MOTION PICTURE], flip animation is made from all pictures recorded for flip animation. Delete unnecessary pictures. • Audio cannot be recorded. • You cannot record audio using the audio dubbing. (P105) • Playback may not be possible on other equipment. You may also hear noise during playback on other equipment which does not have a mute function. • Conversion lens cannot be used together with the ND filter (DMW-LND46; optional) and the MC protector (DMW-LMC46; optional). Always detach the ND filter or MC protector before attaching the conversion lens. • Rotate the lens slowly and carefully. 3 Attach the tele conversion lens or close-up lens. [CONVERSION] Using an optional lens Press [ MENU SET ] to display the [REC] mode menu and select the item to set. (P71) The tele conversion lens (DMW-LT55; optional) allows you to record even more close-up pictures (1.7k more). The close-up lens (DMW-LC55; optional) allows you to take close-up pictures of a small subject. • The lens adaptor (DMW-LA3; optional) is necessary to attach a tele conversion lens or close-up lens. 86 VQT1F83 • You cannot attach a tele conversion lens or the close-up lens to the hood adaptor (supplied).
-
 1
1 -
2
-
3
-
4
-
5
-
6
-
7
-
8
-
9
-
10
-
11
-
12
-
13
-
14
-
15
-
16
-
17
-
18
-
19
-
20
-
21
-
22
-
23
-
24
-
25
-
26
-
27
-
28
-
29
-
30
-
31
-
32
-
33
-
34
-
35
-
36
-
37
-
38
-
39
-
40
-
41
-
42
-
43
-
44
-
45
-
46
-
47
-
48
-
49
-
50
-
51
-
52
-
53
-
54
-
55
-
56
-
57
-
58
-
59
-
60
-
61
-
62
-
63
-
64
-
65
-
66
-
67
-
68
-
69
-
70
-
71
-
72
-
73
-
74
-
75
-
76
-
77
-
78
-
79
-
80
-
 81
81 -
 82
82 -
 83
83 -
 84
84 -
 85
85 -
 86
86 -
 87
87 -
 88
88 -
 89
89 -
 90
90 -
 91
91 -
92
-
93
-
94
-
95
-
96
-
97
-
98
-
99
-
100
-
101
-
102
-
103
-
104
-
105
-
106
-
107
-
108
-
109
-
110
-
111
-
112
-
113
-
114
-
115
-
116
-
117
-
118
-
119
-
120
-
121
-
122
-
123
-
124
-
125
-
126
-
127
-
128
-
129
-
130
-
131
-
132
-
133
-
134
-
135
-
136
-
137
-
138
-
139
-
140
-
141
-
142
-
143
-
144
-
145
-
146
-
147
-
148
 |
 |
